 ObsiKO
Advanced Markdown
If you've got the basics down, it's time to level up! Tables, math, callouts, footnotes, even diagrams. Let's make your writing more polished and rich. 😎
Actually, you don't need to memorize any of this — it's all in the cheat sheet. Just find it, click it, and it's inserted for you.
← Back to basics: Markdown Basics · Home: ObsiKO 101
Neatly organized tables 📊
- A few symbols and you're done:
| Head | Head |/| --- | --- |/| Value | Value | - In ObsiKO, tables render beautifully — and you can edit them while they stay rendered. Click a cell and a small floating editor appears right over it (no unrendering to source): Enter moves down, Tab / Shift+Tab moves across (Tab on the last cell adds a new row), Esc cancels, clicking outside saves. Want the raw markdown? Alt+Click drops into source editing.
- Hover over a table and edit handles pop up:
- Click the vertical
+at the right edge to add a column, or the horizontal+at the bottom to add a row. They're snapped right to the table's edge, so it's intuitive. - The ✕ that appears on each cell (header · first cell) deletes that column/row.
- Inside a cell, press Tab to hop to the next cell, Shift+Tab to go back. Press Tab in the very last cell and a new row is added automatically!
- Small buttons on the header row let you change that column's alignment (left/center/right), or sort by this column (ascending↔descending, smart about numbers too).
- Grab the handles on the table's left/top edges to drag-reorder rows and columns! (Works with drag on touch devices too.)
- Right-click a table (long-press on mobile) to bring up every table operation in one menu: insert above/below · left/right, alignment, add a sum row/average row (auto-calculates numeric columns), align source (tidies the raw Markdown into neat columns), and even copy as CSV!
Excel/CSV straight into a table 📋
- Copy a range from Excel or Google Sheets and just paste it into a blank line — ObsiKO automatically converts it into a Markdown table. Plain CSV text works the same way!
- Conversely, copy a table as CSV (right-click menu) to move it cleanly into another app.
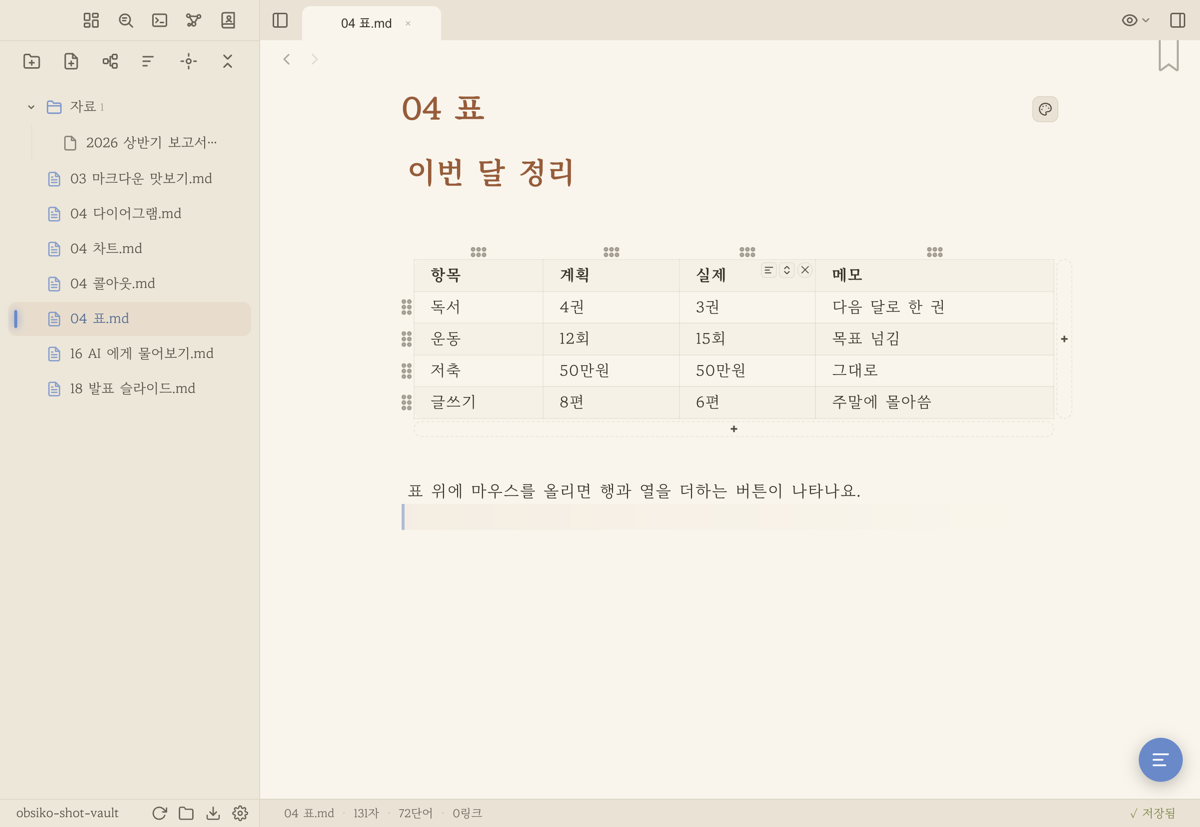
▲ Hover over a table and the vertical + on the right (add column) and horizontal + at the bottom (add row) appear snapped right to the table.
Make it stand out: Callouts 💡
- Write
> [!note]and you get a nice highlighted box. - Pick whichever style fits the moment! (note/info, tip/hint, success/check, warning/caution, danger/error, quote, question/help, example, etc. — grouped by color)
- Put a title and body together inside the box to make important content really pop.
Free-form emphasis boxes: custom containers 📦
- Want a box with your own label that isn't one of the built-in callout types? Try a custom container!
- Open with
:::name, close with a line that's just:::and no name:
:::Summary Write your content here and it renders as a box. **Bold**, lists — it all still works! ::: - On screen, the
:::markers disappear and it becomes a clean box with the name shown as a small header label. Put your cursor on that line and the raw source shows again so you can edit it. - The name is entirely up to you (
Summary,Note,Column…). Export to PDF/HTML and it becomes amd-container-nameclass, so you can style each name differently if you like. → Export - 💡 To close it, use just
:::with no name! (Writing:::endwith a name is read as opening a new box, so it won't close.)
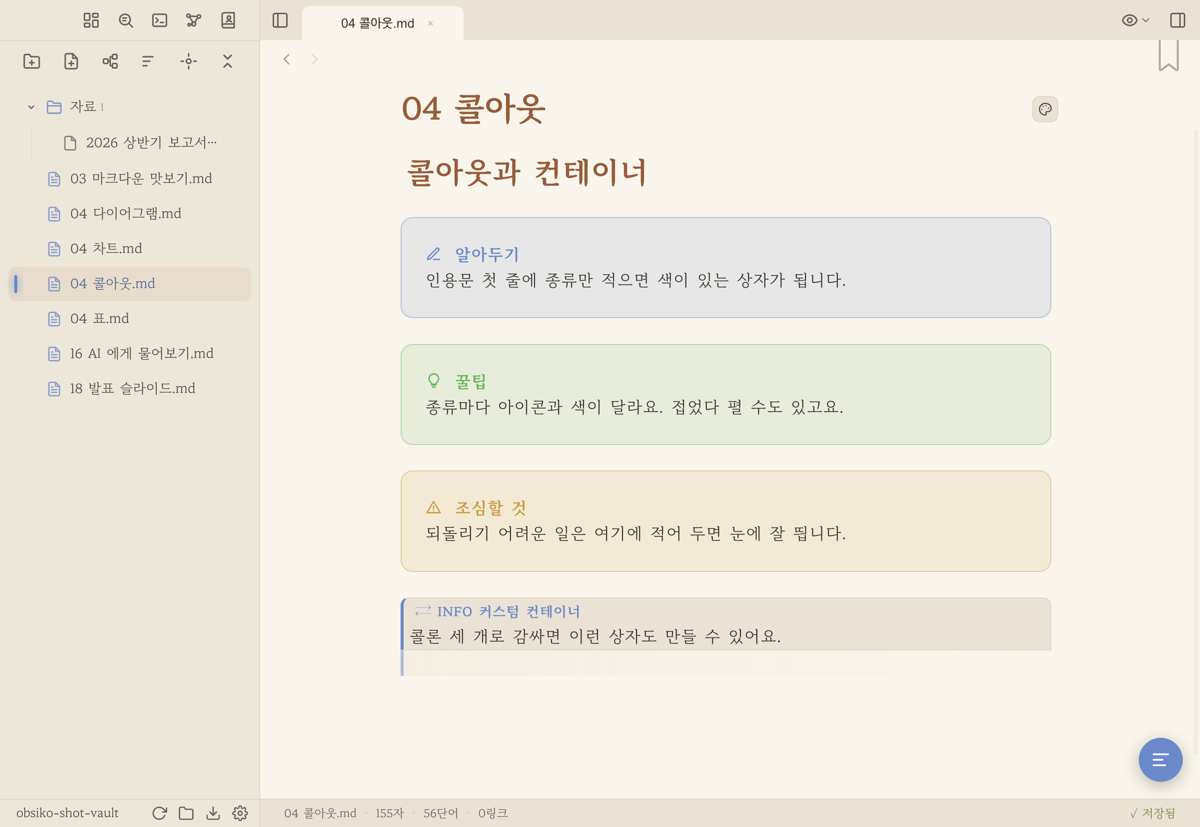
▲ Callouts (built-in icons) and custom containers (free-label boxes) — make important content pop.
Save the details for later: footnotes 📝
- Mark a spot in your text with
[^1], then at the very bottom of the document write[^1]: A friendly extra explanation.
Handle complex math with ease (KaTeX) 🧮
- Inline:
$E = mc^2$ - Centered and large:
$$ your equation $$ - ObsiKO is smart about it — the library is only loaded when you actually need math, so it stays fast!
That programmer scent: code blocks 💻
- Wrap text with three backticks above and below for a nice code block.
- Add a language name on the opening line (e.g.
python) and you get syntax highlighting by default, plus a copy button so you can grab it with one click.
Fold away long stretches: heading folding 🔽
- Hover over a heading (
#) and a ▾ arrow appears right next to it (just like Obsidian!). Click it and everything under that heading folds away until the next same-level heading. A folded heading keeps a clearly visible ▸ arrow so you can see at a glance what's collapsed (click the '…' to unfold). - Keyboard works too —
⌘⌥[(fold) /⌘⌥](unfold) on Mac,Ctrl+Shift+[/Ctrl+Shift+]on Windows. Perfect for browsing a long document section by section! - On mobile the arrow stays subtly visible next to headings — just tap it to fold.
Draw your thinking: diagrams (Mermaid) 🧜♀️
- Write code inside a fence (
mermaid) and flowcharts or sequence diagrams appear like magic. - They render in colors that match your ObsiKO theme perfectly, and you can switch between 3 styles (classic/neo/handDrawn) in settings to suit your taste!
- Clear colors and crisp text — pie slices, bars and mind-map branches each get a distinct color, and flowcharts color each shape differently: boxes = accent, decisions (diamonds) = yellow, circles = green. Change your accent color and the diagrams follow. Diagram text uses a sans-serif so it stays readable in small boxes (your body font doesn't change).
- 🔍 Zoom view — tap the magnifier at the top right of a diagram to open it full screen. Drag to move; zoom with the wheel, two fingers or the +/− buttons; the middle button fits it to the screen; Esc or a tap outside closes it. On phones you can also spread two fingers on the diagram. Wide diagrams shrink to fit the column but stop at 80% so the text stays legible — just scroll sideways.
-
The cheat sheet's "Mermaid Diagram" section lets you insert flowcharts, sequence, class, state, Gantt, pie, and mind-map diagrams — plus ER (entity-relationship) and timeline diagrams — with one tap.
-
Hit the ✎ button on a rendered diagram to edit it in place — pie gets a label/value form, xychart gets an X-axis & series values form. Flowchart, sequence, gantt, timeline, journey, quadrant and state diagrams get a text-extraction form: node labels, messages, task names, dates and coordinates listed as inputs, so you can edit them without touching the syntax. + Add line appends new tasks/events/points/edges from a per-type template, and item lines (tasks, events, messages…) can be deleted whole with ✕ (structural lines like titles and sections are protected). An 'Edit as text' toggle is always there. Mindmaps go further — besides editing branch texts you can add sibling (+) / child (⤷) branches and delete (✕) right in the list.
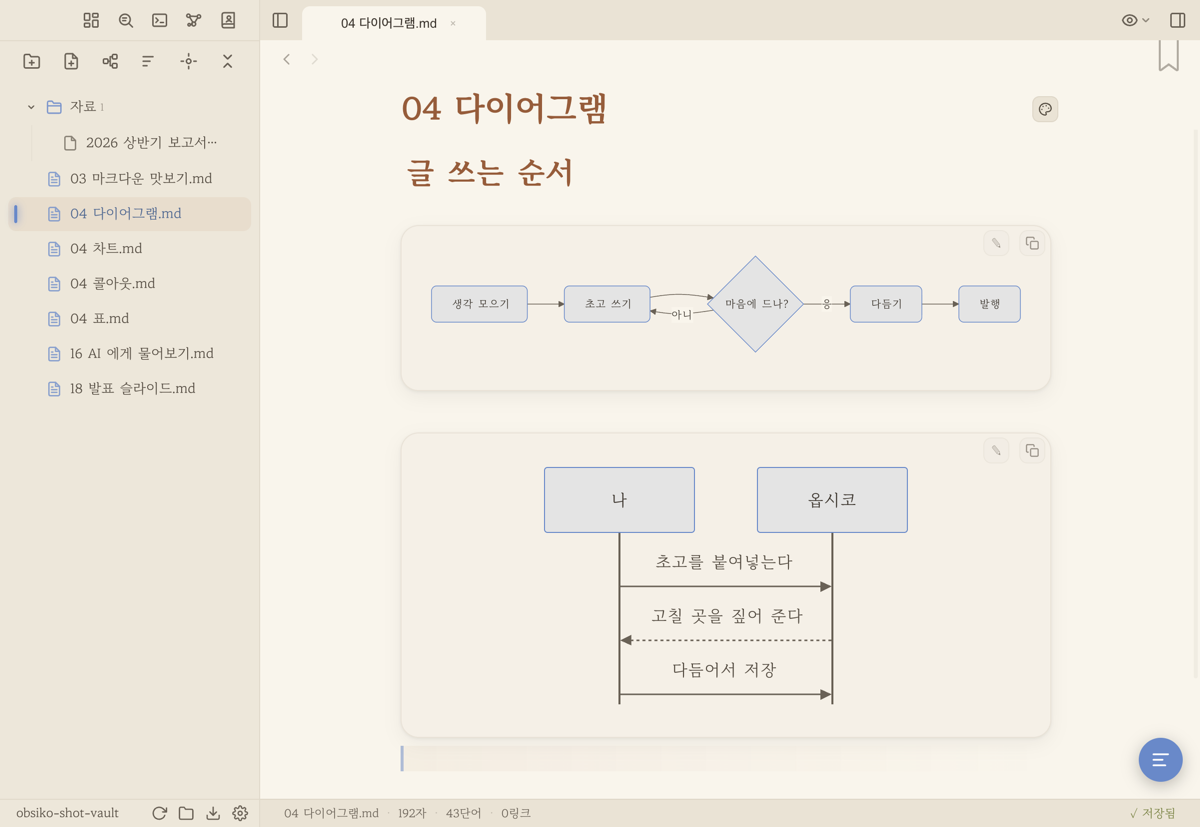
▲ Write it inside mermaid and flowcharts/sequence diagrams appear in your ObsiKO theme colors!
Turn numbers into pictures: charts 📈
- If Mermaid excels at relationships and flow diagrams, the
chartblock draws numeric data into clean graphs (lightweight, with zero external libraries!). -
Just write JSON inside the block and you're done:
chart
{ "type": "bar", "title": "Monthly Sales",
"labels": ["Jan","Feb","Mar"],
"series": [{"name":"Sales","data":[10,20,15]}] }
``` -
Over 20 chart types! Pick whichever fits your situation (the
"type"value): - Comparison: bar (
bar) · horizontal bar (hbar) · stacked bar (stacked) · lollipop/ranking (lollipop) - Trend: line (
line) · area (area) · slope/before-after (slope) · waterfall (waterfall) - Proportion/composition: pie (
pie) · donut (donut) · treemap (treemap) · funnel/conversion (funnel) · gauge/progress ring (gauge) - Distribution/relationship: scatter (
scatter) · bubble (bubble) · radar/hexagon stats (radar) · boxplot (boxplot) · dumbbell (dumbbell) - Special: heatmap/matrix (
matrix) · GitHub-style activity calendar (calendar) · Venn diagram (venn) · fishbone/cause-and-effect (fishbone) - Venn:
{"type":"venn","sets":[{"name":"A","items":["x","y"]},{"name":"B","items":["y","z"]}]}— the intersection is calculated automatically from shared items (works with both 2 and 3 sets). - Fishbone:
{"type":"fishbone","problem":"Problem","categories":[{"name":"People","causes":["Cause 1"]}]} - Pie and donut charts are bigger, with the legend stacked on the right. Gaps between slices keep a constant width and have rounded corners (pie slices meet at the centre, where any gap turns into a wedge — so pie has no gap at all).
- Gridlines are actually visible now. They — and the radar chart's web — used to be so faint you couldn't read values off them. Vertical headroom is tighter too, so bars look less squashed.
- Light and dark themes have separate palettes: soft, calm tones that suit the cream background in light, slightly more vivid in dark. Override them with the
--chart-1…--chart-6CSS variables if you like. - Colors follow your ObsiKO theme, and the cheat sheet's "Charts & Diagrams" section lets you insert everything from basics (bar, line, area, pie, donut, bubble) to specialty charts with one tap. You can even ask the AI Agent to "draw a chart (or radar/Venn/fishbone…) from this data" (desktop).
- Hit the ✎ button on a rendered chart and a small editor popup appears — fix the title, labels and numbers right there without opening the source (add/remove rows, Enter = save, Esc = cancel). + Add column adds another series, so you can overlay two characters on one radar or put two years side by side on a bar chart — the name you type in the column header becomes the legend, and each column's ✕ removes it (charts that only draw one series — pie, treemap, funnel, waterfall — don't show the button). Every type gets a fitted form — Venn (sets & items), fishbone (problem & causes), scatter/bubble (point coordinates), activity calendar (date & value), gauge, heatmap (2D grid), box plot. An 'Edit as JSON' toggle is always there if you want the raw source.
- Both charts and Mermaid diagrams are rendered as real images when exported to PDF/HTML! Even when you merge several notes into one export from a dark theme, they're drawn in light colors that suit the white page. → Export
- Charts get the same 🔍 zoom view at their top right, just like Mermaid diagrams.
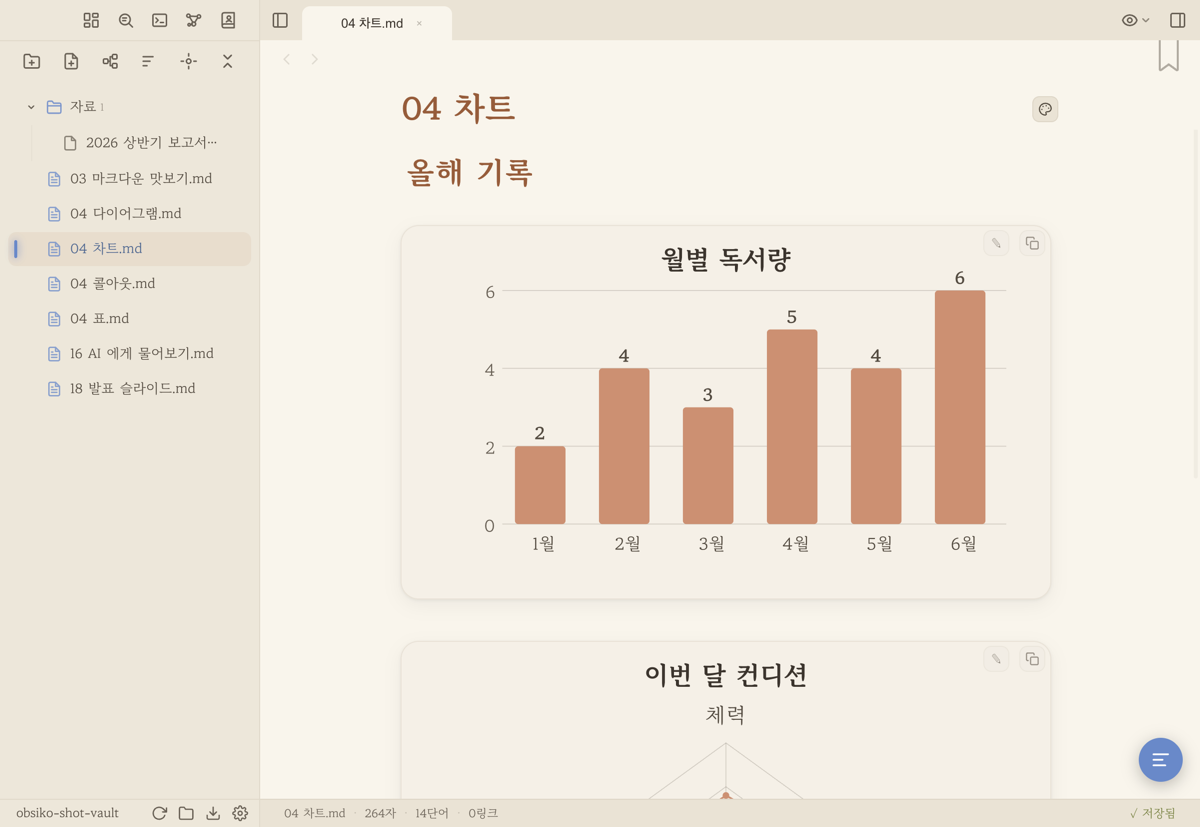
▲ A single chart block covers bar, radar, activity calendar, Venn diagrams, and 20+ more types!
Doodle as you write: inline drawing ✏️
Ever want to drop a quick sketch or handwriting right into your text? Inline drawing slips a drawing pad right where your cursor is, Bear-style. No separate window — the body text slides down to make room for your drawing.
- Four ways to open it:
- Slash menu: on an empty line pick /drawing (or /sketch) — no mouse, no shortcut, the quickest route.
- Mobile: expand the bottom format bar (✏️ floating button) and tap the pencil icon.
- Command palette (⌘P / Ctrl+P): search for 'Insert drawing' — the easiest way on desktop, where there's no format bar.
- Shortcut ⌘⌥Y (Mac) · Ctrl+Alt+Y (Windows/Linux) — opens right at your cursor.
- A roomy canvas: the pad isn't confined to the text column — it stretches to about 90% of the editor width. Drag the bottom edge (center handle) to make it taller; the size is remembered.
- A slim toolbar outside the drawing: a very thin vertical toolbar sits on the left (it never covers your drawing space). Pens, modes, and layers are tucked into group buttons that pop open on tap.
- Every pen from the mind map 🎨: soft pen, rough pen, liner, flat nib, brush, sign pen, pencil, crayon, airbrush, highlighter, blend brush, and eraser — with the same palette, thickness, and opacity controls. See freehand drawing in 11 Mind Map for pen details.
- Apple Pencil, S Pen & Wacom pressure ✍️: pen pressure from iPad Apple Pencil, Android S Pen, and desktop pen tablets carries straight through. Handwriting feels natural!
- On iPad, handwriting input pauses while you draw: iPadOS Scribble stays out of the way as long as the pad is open, so pen strokes never turn into typed text. Close the pad and Scribble works in your note exactly as before.
- Pick your paper 📄: the paper button in the toolbar offers lined, grid, dots, manuscript (and none). The manuscript paper is the traditional Korean 원고지 — red cells with a narrow correction gutter between rows. The paper you choose is saved with the drawing, so it's still there in your note, in exports, and in print — it isn't a guide that vanishes when you save. Lines brighten themselves in dark mode, and print always uses a light grey.
- Paper is remembered per drawing (a new pad always starts with none) — you don't want yesterday's manuscript grid showing up when you just need one arrow. You can switch back to none any time.
- Turning paper on never snaps your strokes to the lines — it's a visual guide only; what you drew stays exactly as drawn.
- Grid and magnet stay off: it's a sketch inside a note, so grid and snap are off by default for free drawing.
- No keyboard pop-ups: the virtual keyboard stays down while you draw, keeping the screen clear.
- Auto-saves as an image: click (tap) outside the pad, or press Esc or the ✕ at top right, and the drawing is saved to assets/ as an SVG image with  inserted in place (there's no separate save button). Brush textures, pressure, and bleeding are captured exactly as drawn, and it displays as a picture in Obsidian, GitHub, and other apps too.
- Edit any time ✎: double-click (double-tap on mobile) a drawing and the editor pad reopens right on top of the original — keep drawing or fix things, and saving updates it in place (no new file). A pen (Apple Pencil/S Pen) opens it with a single tap! You can also hover (or tap once on mobile) and use the ✎ button.
- Let AI finish your sketch 🎨✨: right-click the drawing pad (or a saved drawing image) → 'Draw from sketch (AI)…' — choose a model (Nano Banana / gpt-image), size, and quality, add a request, and a finished picture that keeps your composition lands in the note right below your drawing (chat API key required). See 'Sketch → AI image' in 11 Mind Map.
- 💡 Buttons on images stay hidden: every image in your notes reveals its alt badge, magnifier (zoom view), ✎, and resize handle only on hover (or one tap on mobile) — no clutter until you need it. For the zoom view, see → 03 Markdown Basics
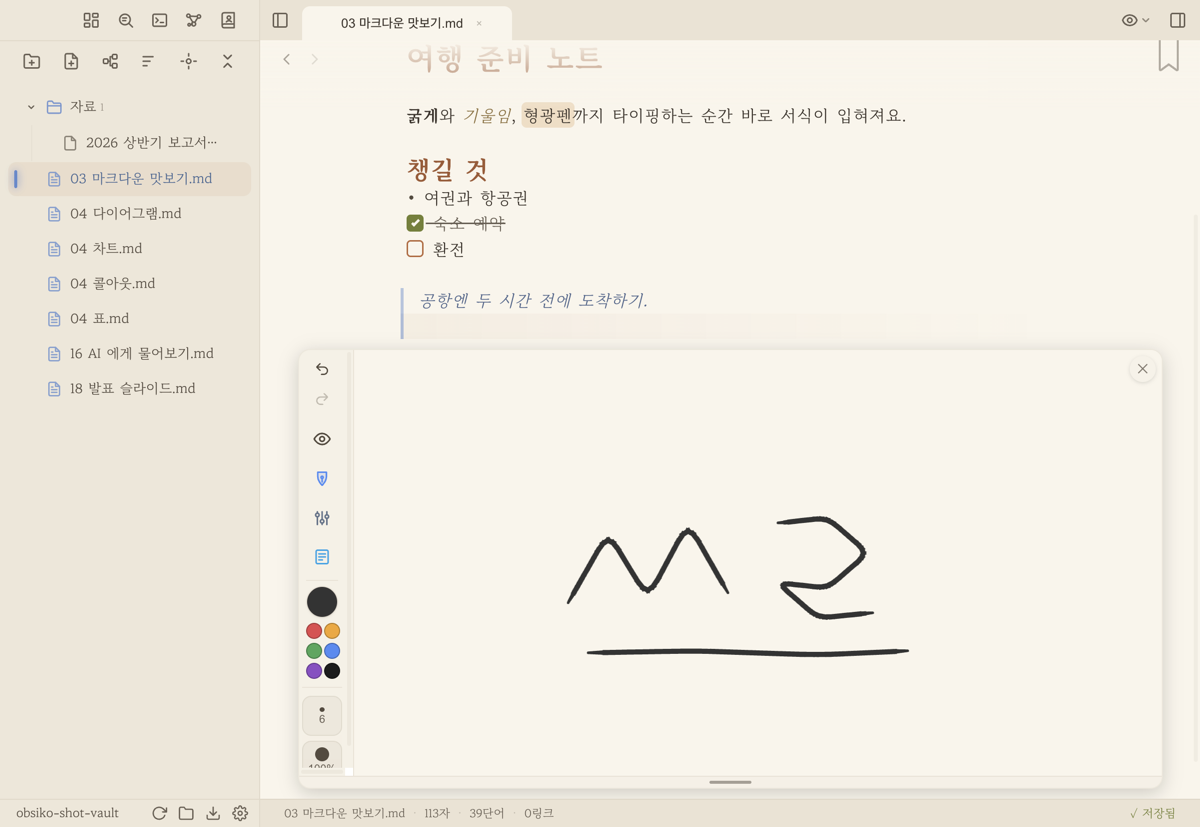
▲ Right at your cursor while you write — sketch away with the thin toolbar on the left, and it saves as an image!
Fold it open and closed: collapsible blocks (toggle boxes) 🔽
- Got content you usually want to keep hidden because it's long? Use
<details>and<summary>tags to make a collapsible box! - Like this:
Click here to expand
Write the content you want to hide. **Bold**, lists, `code` — the Markdown still works fine inside!- ObsiKO shows collapsible-block tags as a nice box you can fold and unfold right in the editor. Tap the box and it slides open, and the Markdown inside renders properly too!
Closing tags handled automatically: smart tags ✨
- Besides
<details>, you probably use tags like<mark>and<kbd>, plus AI-document tags like<thinking>,<constraints>,<examples>a lot, right? ObsiKO fills in the closing tag for you! - The moment you close an opening tag like
<thinking>with>,</thinking>is added right after, and your cursor lands right in between (<thinking>│</thinking>). (Tags that don't need closing, like<br>or<img>, are smartly skipped.) - Just type
<and a list of frequently used tags pops up as autocomplete — everything from HTML tags to AI prompt/guideline tags like role (<role>), instructions (<instructions>), examples (<examples>), reasoning (<reasoning>), with over 200 ready to go. Tags you've used before are remembered and suggested again next time. - Structure tags captured this way also show up as a tree in the outline (structure explorer), making navigation much easier. → Backlinks & Outline · For using this with AI documents → Building an LLM Wiki
Drop in an entire other note: note embeds 🪆
- Just add a
!in front of a wiki link, like![[Note Name]], and that note's content unfolds as a box right inside this document! Really handy for reusing a frequently used notice or summary across multiple notes. - Want to pull in just one section? Point to a specific heading with
![[Note Name#Heading]]. Only that section gets embedded. - Click the box's title to jump straight to the original note. (This is automatically distinguished from image embeds
.) - Three kinds of file can be embedded: notes (
.md) 📄, mind maps (.canvas) 🗺, and data tables (.base) 📊. Write![[Tasks.base]]and that table unfolds as a box. → Bases (Data Tables) - 💡 Note embeds don't update live. Edit the original note and the box in an already-open document stays as it was — reopen that document and it refreshes with the new content. (
.baseand.canvasembeds, on the other hand, redraw their snapshot as soon as the original is saved or changed.)
Play YouTube and music right inside your note: media embeds 🎬🎵
- Just paste a YouTube/Vimeo video or SoundCloud/Spotify/Apple Music/Mixcloud URL into your note, and a playable player appears right there! (Works whether the URL is alone on a line, or wrapped as
.) - Video/audio file URLs hosted online (
.mp4,.webm,.mp3,.m4a, etc.) also show up as a player the same way. - Audio and video files kept in the vault play right where they are, too. Write a relative path like
: audio becomes a playback bar (.mp3,.m4a,.wav,.ogg,.opus,.webm) and video a small player (.mp4,.mov,.m4v). Put the cursor on that line and the source text comes back. A video over 80MB shows “open it in the reference view” instead of playing, to protect phone memory. → Search & Navigation - Click the ↗ button at the top of the player's title bar (or right-click → "Open in Reference View"), and it pops up large in the Reference View panel on the right so you can watch/listen while you write. → Search & Navigation
- For videos, the 📷 button on the title bar captures the current frame as an image into your note! (Embeds like YouTube can't be captured due to security restrictions — this works with direct video files.)
- Want to fix the URL? Click the player's title bar. It reverts to the original URL (source) for editing. (Put your cursor on that line any time to see the raw text.)
- These YouTube, map and music embeds also show up on shared web pages and in HTML exports (YouTube as a thumbnail card that opens in a new tab). Google Maps works with links that contain a place name — short links copied from the app (maps.app.goo.gl) stay plain links. Print/PDF shows a link instead.
💡 An audio file in the vault doubles as background music in the story viewers — the very same
line is a playback bar in the editor and BGM in the ebook, messenger and visual novel views. → Messenger & Visual Novel Views
Automatic table of contents in your document: inline TOC 🧭
- Anywhere in your text, write
[toc]on its own line. A table of contents built from your headings appears there instantly. Click an entry and the view scrolls smoothly to that heading. - Add or edit headings and the TOC automatically updates to match. (This is separate from the outline in the right-side panel — it's a table of contents embedded right in the document body. → Backlinks & Outline)
A little higher, a little lower — superscript & subscript ⁰¹
- Superscript:
E=mc^2^→ E=mc², subscript:H~2~O→ H₂O — just wrap with^...^and~...~. - (For more complex equations, KaTeX
$...$gives a cleaner result.)
Notes only you can see: comments %% %%
- Wrap text like
%%this is a secret note%%with%%and it's always hidden on export, while the body shows just a small speech-bubble icon by default. Click the icon to view, edit, or delete the comment right there in a popup — no source view needed! Perfect for draft notes or "fix this later" markers. - Choose how comments appear in Settings ▸ "Comments (%%)": bubble icon (recommended) / hidden / always shown (dimmed). The dimmed mode shows just the comment text, quietly hiding the
%%markers so your page stays clean. Comments stay quietly tucked away even while you edit that line (the cursor simply skips over them). When you want the raw text, use whichever suits you: click the icon · Source view (⌘⇧O) · the "always shown (dimmed)" setting.
Your document's ID card: frontmatter (YAML) 🪪
- Create a space wrapped in
---and---at the very top of your document and write metadata liketitle:andtags:. Note that it must start on the document's very first line to count as frontmatter. - You don't even have to type it yourself! Right-click →
+ Insert▸Insert Frontmatterin the body and a box pops up already filled withtitle(current title),type(note), andcreated(today's date). (The+ Insertgroup only appears when no text is selected, and if the document already has frontmatter the 'Insert Frontmatter' item is hidden entirely — no way to end up with two.) - Click the "Add Property" button below the box and a key input field appears, suggesting keys you've used before as autocomplete (you can also pick with the ↑↓ arrows). When you use the app in Korean, Korean properties like
상태,마감일, and태그show up alongside the English ones too. And the value field smartly adapts to the key: - Keys with a fixed set of values, like
status/priority, get a dropdown. - Relationship keys like
related/sourcelet you search notes right in the value field and pick one as a wiki link (multiple allowed too). - List-type keys like
tagslet you enter multiple values as chips, suggesting tags already used in your vault. - Date keys like
due/createdget a calendar, and modified-date keys come pre-filled with today's date. - For the full property list and how each one is entered, see Frontmatter Properties!
- The copy button at the top-right of the frontmatter box lets you copy the whole thing (just like other blocks!).
- Need HTML-style metadata instead of Markdown (YAML)? Click "Frontmatter (HTML meta)" in the cheat sheet's HTML section and a
<meta name="title" content="...">block is inserted for you — a universal format that works across engines and platforms. - Take a look at the top of this very wiki page for a good example!
Grouping things with hashtags 🏷️
- Write
#taganywhere in a document and you'll be able to find and filter for it later. → Details: Wiki Links & Tags
Presentations you can't look away from 🎬
- Write
marp: truein the frontmatter and split your slides with---— that's it, you've got a beautiful presentation! → Go make a presentation: Making Presentations
← Previous: Markdown Basics · Home · Next: Frontmatter Properties →