 ObsiKO
AI Agent
Writing alone can feel lonely, right? Meet the smart AI friend who reads, writes, and organizes your notes right alongside you!
💻🆚📱 The full agent described in this document (CLI install + login, everything from research to semantic search to mind map generation) is desktop (PC) only. But now there's a chat-only mode that works with just an API key, so you can chat with AI and organize notes on iPhone, iPad, browser, and the Mac App Store too! → 16-8 Chat-only Mode (Mobile & Web)
🪟 On Windows the Microsoft Store version is the only one, so the full agent on this page (CLI install) isn't available there. Store policy doesn't allow an app to point you to software outside the Store. Chat mode with just an API key takes its place, and semantic search, vault overview, change history, and git integration all still work. → 16-8 Chat-only Mode (Mobile & Web) The Mac App Store build is the same; only the Mac direct download (from the ObsiKO site) works exactly as described here.
🚀 Want to jump straight in? The usage sub-pages below (12-1 through 12-8) walk you step by step through workflows, the LLM Wiki, recommended prompts, and chat-only mode!
💳 Confused about what's paid (credits) vs subscription? From the ⓒ badge to creating API keys → 16-9 AI Billing Guide
← Home: ObsiKO 101
Where's it hiding? 🧐
- Open the right sidebar and you'll find a sturdy AI Agent panel waiting for you.
- Just tell it what you want in the chat box. The agent will carefully read through the files in your vault and edit them for you!
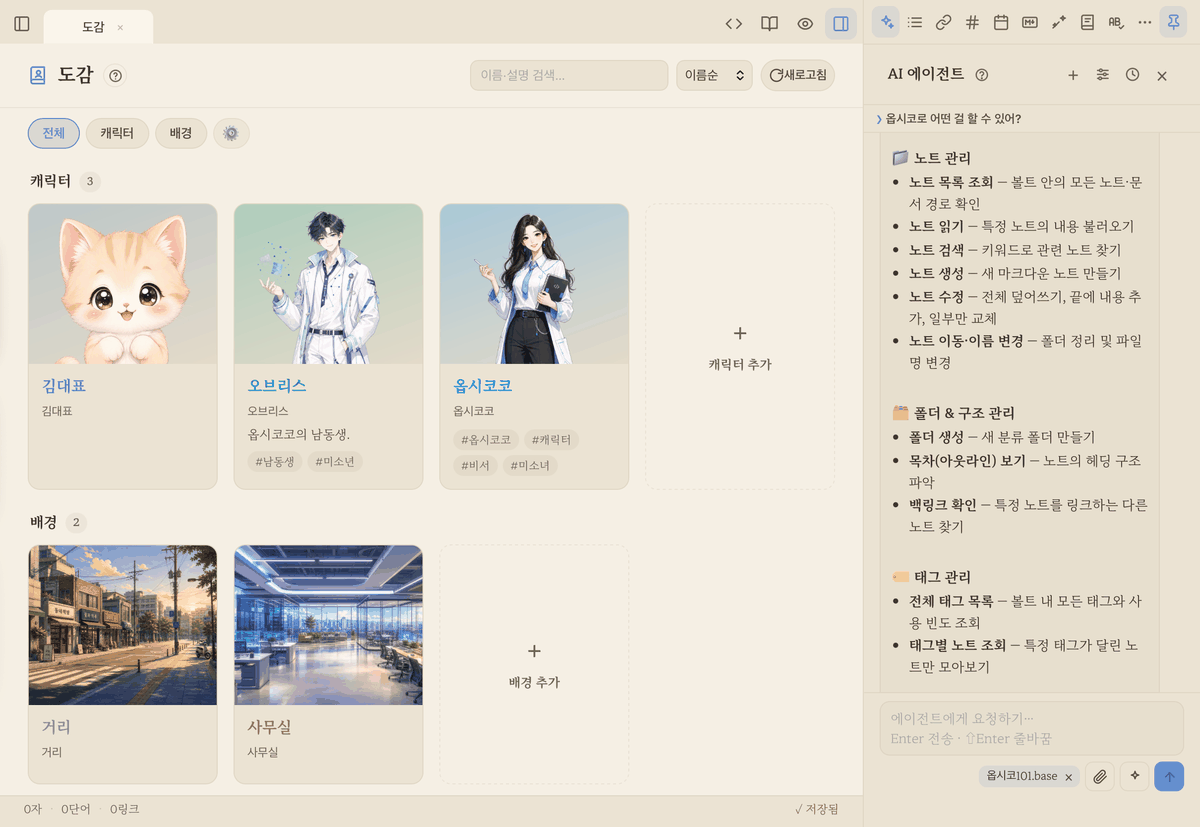
▲ Chat with your AI assistant in the right panel and organize notes together. (The full agent on this page is desktop-only · chat-only mode also works on web & mobile)
Pick your own AI engine 🧠
- Click the engine selector button (✨) in the tool row below the input box — the menu opens upward.
- You can choose whichever smart engine you like among Claude, Gemini, and Codex! (Each one requires installing its CLI and logging in — or setting an API key as an environment variable.) Rest assured, ObsiKO only passes your key securely to each tool and never peeks at it!
- 🔑 Gemini is free with an Antigravity CLI (
agy) login: Google retired the old Gemini CLI for individuals in June 2026 and replaced it with Antigravity CLI. Install it in a terminal withcurl -fsSL https://antigravity.google/cli/install.sh | bash, runagyonce to log in with your Google account, and ObsiKO automatically runs the Gemini engine through agy (no API key needed, Gemini 3.x models). Without agy it falls back to the old CLI + API key path, so existing setups keep working. The engine help (?) panel has one-click install/login buttons too. - If you're not sure which to pick, we recommend Claude (the help '?' shows a (Recommended) badge too). Features like the self-review loop or reading scanned PDFs/images work best with Claude.
- The engine list shows each engine's installed version (like
v0.3.x) alongside the actual model ID each entry uses. Entries like Default update their display to the latest model actually used after you run that engine once (it remembers that value for next time), and updating the CLI refreshes the version display too. (Install/connect instructions are in the help '?', via the [Install]/[Login] buttons next to each model.) - If the first-time install feels daunting: the prompt that appears when the CLI isn't installed yet walks you through everything — from how to open a terminal (Mac: ⌘+Space to open Spotlight → "Terminal" / Windows: Start button or ⊞Win → "Terminal" or "PowerShell") to the install and login commands, all with [Copy] buttons. Just paste it (Mac ⌘V / Windows Ctrl+V) and you're done!
- The research and semantic search tools described below work the same whether you pick Claude, Gemini, or Codex (ObsiKO wires them up automatically, so there's nothing extra to configure). Only two things are Claude-exclusive — scanned-PDF OCR and image viewing. (For reference, opening web pages directly and screen capture are off on every engine — they stalled too often depending on the site, so we turned them off for stability and write from web search results instead.)
Safety first! ObsiKO's thorough protection 🛡️
- The agent's range of activity is strictly limited to your current vault. ObsiKO firmly blocks it from touching important files outside the vault or running suspicious commands!
- When the agent edits a file, the file tree refreshes immediately to show it, and if the agent tries to overwrite a file you're actively editing (not yet saved), you'll always get a warning first. Your writing matters!
- You can also decide what the AI never sees 🔒: hide sensitive notes — journals, health records — with a single
ai: denyline in the frontmatter, or a whole folder via an.obsiko-ai-ignorefile. And in the other direction, you can check which notes an answer was based on ([S1]citations and the source list). → AI Sources & Privacy
Handy features worth knowing ✨
- Answers land neatly in files: when you ask it to make something — like "organize ○○ for me" or "write a piece on △△" — the agent doesn't sprawl it across the chat; it saves a tidy
.mdfile instead. (Short questions or explanations still get answered right in chat.) - Charts land in a note as real charts, not pictures!: give it numbers ("chart this data") and it writes a
```chartblock into a note — ObsiKO renders it right there as a real SVG chart, and it survives exports and presentations too (it will not generate an image for this). → separate from the chart view in 12 Bases (Data Tables). - Flows & relationships go to canvas or Mermaid: "draw a mind map" or "draw a flowchart" become a mind map (
.canvas) or a Mermaid diagram inside a note. When a canvas needs a chart, it writes a small note holding the chart and drops a file card pointing at it (the card renders the chart live). → 11 Mind Map - Copy, insert & save as note: use the Copy, Insert, and Save as Note buttons under the agent's reply bubble to grab an answer you like onto the clipboard, drop it straight into the note you're working on, or turn it into a brand-new
.mdnote. - Hand it reference material: drag and drop other notes in your vault, asset files like images and PDFs, or even files from outside, straight into the agent chat box. It's like saying, "Read this too and take it into account!"
- A tidier input box: the model selector, add-reference, helper and send buttons are all grouped right-aligned below the input box. Attach several reference files and only one shows, with the rest folded into a
+n, so the input box never wobbles and stays neat. - Start a chat with a helper: press the person button (Helpers) under the chat box to see your saved helpers. Pick one and a new chat opens; while its name shows on the badge above the chat box, it keeps that role for the whole chat (calling it with
/applies it just once). Give a helper reference notes (character, world or style notes) and they're attached every time you use it — pick them in the 'Reference notes' field under Prompt Helper ▸ Harness ▸ Create slash command. The badge's × ends the helper and starts a new chat. The first time you use a helper from your vault on a device, ObsiKO first shows what it will tell the AI (it may have arrived through sync or sharing). - Magic slash commands: type just
/in the chat box and a whole list of helpers pops up! Create a markdown file in your vault to add your own custom commands (the most recently used ones show up on top). There are two folders, so don't mix them up —.claude/commands/is read by the desktop agent (Claude Code compatible), while_ObsiKO/commands/is read by the desktop agent and phone/web chat. Want it available everywhere? Put the same file in_ObsiKO/commands/(if both have the same name,_ObsiKOwins). - Travel back in time: "Wait, what did we talk about earlier?" Click the clock button at the top of the panel to fully restore a past conversation. For conversations from other devices or older ones, press 'Find in saved chat transcripts' at the bottom of that list to find them in the transcript files and carry on (when chat transcripts are being saved). You can also just ask the AI, "find where we talked about X." → Personal Memory
- A 'completion card' when the task is done: once a task that creates or edits files finishes, the chat shows a ✅ Task complete · N sec · tokens used card along with a list of changed files (🆕new · ✏️modified, click to open right away). Hover over the token number and it splits into input/output.
- A report on how and why: when a task wraps up, the agent leaves a brief summary at the end of its reply covering its approach, the changes per file, and suggested next steps (toggle this with 'Detailed Completion Report' in options ≡).
The self-review-and-fix 'loop' 🔁 (Claude only)
Write once and done? Not anymore! The agent now runs a smart loop that reviews and rewrites the notes it just wrote, on its own. Turn this on or off from the panel's Options (≡) button → 'Loop' category.
- ① Self-verification loop (on by default): right after saving a note (
.md), it checks its own Markdown syntax, and if there are errors that would break rendering (unclosed code fences, mismatched table columns, etc.), it fixes them immediately. - ② Completion gate (on by default): right before wrapping up a task, it does a final check on all the notes written during that task, and fixes any remaining syntax errors before finishing.
- ③ Critic loop (off by default): an independent reviewer evaluates the result against your original request, points out shortcomings, and has the agent improve it. Turn this on when quality matters most (it uses more tokens). Set the reviewer engine to Gemini or Codex instead of Claude, and a model from a different company cross-checks the work — an even stricter review.
Every time a loop kicks in, the chat shows a single 🔁 line telling you which check ran and which round it was. While the critic is reviewing, the status bar also shows 'Reviewing results.'
- Retry limit slider: adjust the maximum number of times each loop sends work back for another pass, from 1 to 20 (to prevent endless loops).
- Infinite attempts: turn this on if you really want it to keep at it until it passes — it repeats until verification succeeds. You'll get a warning that it may use a lot of tokens though (the internal turn cap and inactivity watchdog still act as a final safety net, so it never truly runs forever).
💡 This loop is Claude-engine only (Gemini and Codex carry a task through to completion on their own).
Split big jobs & run them together — Parallel delegation 🔀 (Claude only)
Hefty jobs like "research these 10 topics and make a note for each" take forever one at a time. Turn on Options (≡) → 'Multi-engine collab' → 'Parallel delegation' and the agent splits the job into 2–8 independent subtasks that run at the same time (3 at once), then pulls everything together at the end.
- Progress shows in chat as 🔀 one-liners — like "(3/8) “○○” done". If a subtask fails, the rest keep going and the failure gets handled during the wrap-up.
- Only truly independent work gets split, and ObsiKO makes sure two subtasks never touch the same file.
⚠️ Several runs going at once can burn several times the tokens. Recommended only for genuinely big jobs like bulk research or batch cleanups! Off by default, Claude engine only.
Draw it, then delegate it — canvas as a plan 🗺️
If the AI can draw a mind map for you, why not the other way around? Sketch a folder structure or a work plan on a canvas, attach it as a reference, and say "build / organize / do it according to this canvas".
- Here's how it reads it: group boxes = folders (a box inside a box = a subfolder), note cards = existing notes, text cards = new notes to create (first line = the title). When you ask it to do work, text cards become tasks and arrows = the order to do them in.
- It can reorganize existing files too: instead of making copies, the agent uses a safe move tool that relocates the originals (no overwriting; hidden folders like the trash are off-limits). Moving 5 or more files? It shows you the list and asks first. Moves land in Change History, so they can be undone.
- Turn a procedure into a skill: say "make this a skill" and it saves the steps to
.claude/skills/in your vault — next time you ask for that job, it follows the recipe.
💡 Moving files works on the Claude engine only (Gemini·Codex can create, not move). For how to draw a canvas, see 11 Mind Map!
Undoing AI's changes — Change History ⏮️ (virtual worktree)
"Wait, I don't like what the AI changed — can I revert it?" Now you can! Every time the agent creates or edits files, it saves a before/after snapshot per run, so you can compare and revert anytime. It's a lightweight 'virtual worktree' — no git knowledge required.
- Where? Open the clock icon (AI Change History) panel in the right sidebar nav, and AI runs pile up in a most-recent-first timeline (with friendly timestamps like "just now," "3 minutes ago," "yesterday").
- Filter: once history piles up, use the search box at the top to filter by title, file, or engine.
- Compare (diff): expand a run and each changed file gets a new/modified/deleted badge; click [Compare] to see which lines were added (+green) or removed (−red), right down to which words changed within a modified line. Long unchanged stretches collapse into "n lines identical — expand", so only what matters shows. Click a filename to open that file right away.
- Revert: revert a single file, or use [Revert this whole run] to restore every change from that run at once. (Newly created files get deleted, modified files return to their original content, and deleted files get restored.)
- Undo a revert too (re-apply): reverted files get a 'Reverted' badge, and clicking [Re-apply] brings back AI's edited version — undo the undo! If you've touched the file again in the meantime (its content has changed), it'll always ask you once more before overwriting.
- Works with every engine: Claude, Gemini, and Codex are all recorded. (Claude captures the original right before each write in real time; Gemini and Codex snapshot the originals upfront at the start of the run and compare afterward.)
- Works on every platform 📱: not just desktop — chat-only mode on iPhone, iPad, Android, and the web records and reverts exactly the same way. (Desktop keeps snapshots in an app-internal file; mobile and web keep them in app-internal storage — either way it's outside the vault, so your vault folder never gets cluttered.)
- Your vault stays untouched: snapshots are kept inside the app per run (the last 40). You can also clear the history alone while leaving your files as-is (a confirmation appears before deleting).
💡 Reverting works on text files (notes, canvases, code, etc.). Large files like images or PDFs aren't compared or restored.
Review before changing — working copy first 🧪 (desktop)
"I want to see what the AI will change before it touches my notes" — that's now the default. With Review before changing notes on in Settings (default on), the Claude, Codex and Gemini agents work in a working copy of your notes (an app-internal folder, text files only) and a review card appears under the reply when they finish.
- On the card: new and changed notes are listed; open one to see which lines change. Only [Apply selected] writes to your notes; [Discard] leaves everything as it was. The card's state is kept in the chat history, so it looks the same when you reopen it later.
- No overwriting: right before applying, the originals are checked again — if you touched any of those notes while the AI was working (unsaved edits included), nothing is written and you're told. There's no automatic merging.
- Only note (.md) creation and edits are applied. Runs that include deleting or moving get no apply button (a half-applied move leaves two notes), and canvases, tables and attachments are only counted. Applied changes also land in Change History, so they can be undone.
- AI-blocked notes (
ai: deny,.obsiko-ai-ignore) aren't in the copy at all, so even hook-less engines like Codex and Gemini can't read them. - Isolation differs by engine (honestly): Claude is hard-isolated, Codex can write only inside the working folder, and Gemini simply isn't given the original path and is warned if the original changes mid-run. Turn it off and the agent works directly in the vault as before (automatic runs like routines don't use review mode).
Agent settings live in the panel! ⚙️
AI agent settings that used to be scattered across the settings modal are now all tidily gathered in one place — the Options (≡) button in the panel header.
- Top toggles: Auto-collect personal memory · Record raw conversations · Relax Gemini content filter (all three show up on chat-only engines too — the filter setting applies to every Gemini call the app makes, including chat, image generation, read-aloud and transcription. It shows a caution dialog when you turn it on. → 16-11 Personal Memory)
- Next toggles (desktop CLI engines): Get answers as .md · Token optimization · Detailed completion report · Connect tools to Codex (the last one shows a caution dialog when you turn it on, since it can affect things outside the vault).
- Two one-shot buttons: Build semantic index (index everything for semantic search) · Save conversation summary (summarize this chat into a note)
- Collapsible categories: Loop (see above) · Multi-engine collab · git (auto-commit, remote, push) · Semantic search embeddings (backend, model)
- Multi-engine collab 🤝: the three engines (Claude, Gemini, Codex) help each other out — turn on the consult tools and the engine at work can ask another engine for a second opinion when it's stuck (via tools like ask_gemini); turn on parallel drafts & synthesis and the other engines each write a draft first, which the lead engine then cross-checks and synthesizes. Quality goes up, but so does the token bill. (The Parallel delegation toggle lives in this category too — see the section above!)
- Below that: Engine API Keys fields (leave blank to use login/subscription instead)
- Token usage 📊: below each key field, a running total of input/output tokens used in this app accumulates. It tracks not just chat but agent runs too (Claude, Gemini, Codex), and [Reset] lets you start counting from zero anytime. (This isn't a provider billing dashboard — it's just a reference for how much you've used within ObsiKO.)
- Tap the '?' next to an item's name and the explanation unfolds right below it (tap again to fold it away). With a mouse you can just hover, and on a phone or tablet give it a tap. 📱
Turning all kinds of sources into .md — web, video, documents, images, data 📥
The agent goes beyond simple search — it can turn all sorts of material into notes (desktop). Claude gets every tool, and Gemini and Codex get most of them too (YouTube, PDF, documents, transcription, RSS, tables, document content search, semantic search, graph — plus image generation and narration (TTS), see the image & narration section below). Only image viewing and scanned-PDF OCR are Claude-exclusive.
🌐 Web & video
- Gathering material via web search: give it a topic and it collects web search results (titles, summaries, dates) and organizes them into a .md file — like "summarize the latest news on ○○" (filenames and titles get an automatic YYYY-MM-DD date prefix). For stability, opening and reading pages one by one is off by default — it writes based on the search results instead.
- Summarizing YouTube: give it a video URL and it pulls the captions (transcript) into a .md file. (Only works for videos with captions. More reliable with yt-dlp installed — but works without it too.)
- RSS/news feeds: give it a feed URL and it neatly gathers the latest items (title, date, link, summary) into a digest.
📄 Files & documents (files in your vault or attachments dragged into the chat)
- PDF (text-based): "organize this PDF for me" → it extracts text page by page and summarizes/organizes it.
- PDF (scanned/image-based): even scans where the text is really an image get rendered as page images and read directly (OCR) to transcribe. (Requires poppler — free: macOS brew install poppler, Windows scoop install poppler. Up to 8 pages at a time, so for longer PDFs ask in ranges like "pages 1-10 first." Claude engine only.)
- Images: it looks directly at text in scanned documents, handwriting, charts, or photos and transcribes or describes it (no separate OCR install needed).
- Office & e-books: converts Word, PowerPoint, ODT, EPUB, RTF, HTML, and more into Markdown. (Requires pandoc — free)
- Audio/video transcription: it transcribes lectures, podcasts, recordings, and videos that have no captions. Now transcription runs through cloud APIs (OpenAI, Gemini), so you don't even need whisper installed (if local whisper is present, that's used first). It defaults to Gemini for video and OpenAI for audio. (Besides asking the agent, you can also do this directly via right-click in the file explorer → 'Audio/Video → Note (Transcribe)' or Command Palette → 'Transcribe Audio/Video' — on every platform.)
- Table data: turns CSV, TSV, and JSON files into clean Markdown tables.
- Document content search: it searches through the actual body text of PDF, Word, Excel, Hangul (.hwp/.hwpx), CSV, JSON, and plain-text documents, not just regular notes, to answer "find the document that mentions ○○."
🔧 App & property lookup
- App manual search: ask something like "how do I export a PDF in ObsiKO?" and the agent doesn't guess — it searches this help wiki (ObsiKO 101) directly and answers based on what it finds. (Separate from vault search, which looks through your notes.)
- Find notes by property: it queries frontmatter properties like a database — "list project notes where status is in-progress," "notes with type: book and rating 4 or higher." Filter by folder, tag, and property conditions (AND), then sort. Ask about a .base table and it carries that table's conditions straight into the query. → Bases (Data Tables)
💡
pandoc,yt-dlp, andpopplerare all free tools (since transcription now works via cloud API,whisperis optional). The app works fine without them installed — you'll only get a one-line install tip when you ask for that specific feature.
🛡️ Staying safe: it only reads files inside the vault plus whatever you've attached, and fetches web material safely while blocking private/internal network addresses. If there's no caption or text available, it honestly tells you "there isn't any."
Drawing pictures and reading aloud — AI image generation & narration 🎨🔊
Beyond just reading and writing, it can now draw pictures and read your text aloud! Both features work anywhere — desktop, iPhone, iPad, and web — with just an API key (an OpenAI or Gemini key, under the chat API key in Settings).
🎨 Image generation (text → picture)
- Type "draw ○○" in chat and the agent creates the image, saves it in the vault's assets/ folder, and inserts it into the note.
- Or select a descriptive passage → right-click → '🎨 Create Image with AI' (choose OpenAI or Gemini) and it generates an image based on that text and inserts it right below the selected text.
- Draw from a reference image (sketch → picture) 🖍️: attach a sketch or photo to the chat and say "draw this based on my sketch," and it completes the picture while keeping your composition and linework (image-to-image). Perfect for coloring in and finishing a rough sketch you drew on a canvas.
- When drawing people or characters, it automatically leaves room so the top of the head doesn't get cropped off.
- ✨ Make a title logo: right-click → ✨ AI Create → 'Make title logo' — uses your selection (or the note title) as the wording, with 10 style presets (minimal · handwritten · neon · vintage · 3D · watercolor · web novel · game · video · book), a background choice (solid / transparent / illustrated), model and extra instructions, then inserts the finished logo into the note. Transparent backgrounds are GPT Image-only (true alpha PNG). Short wording renders most accurately!
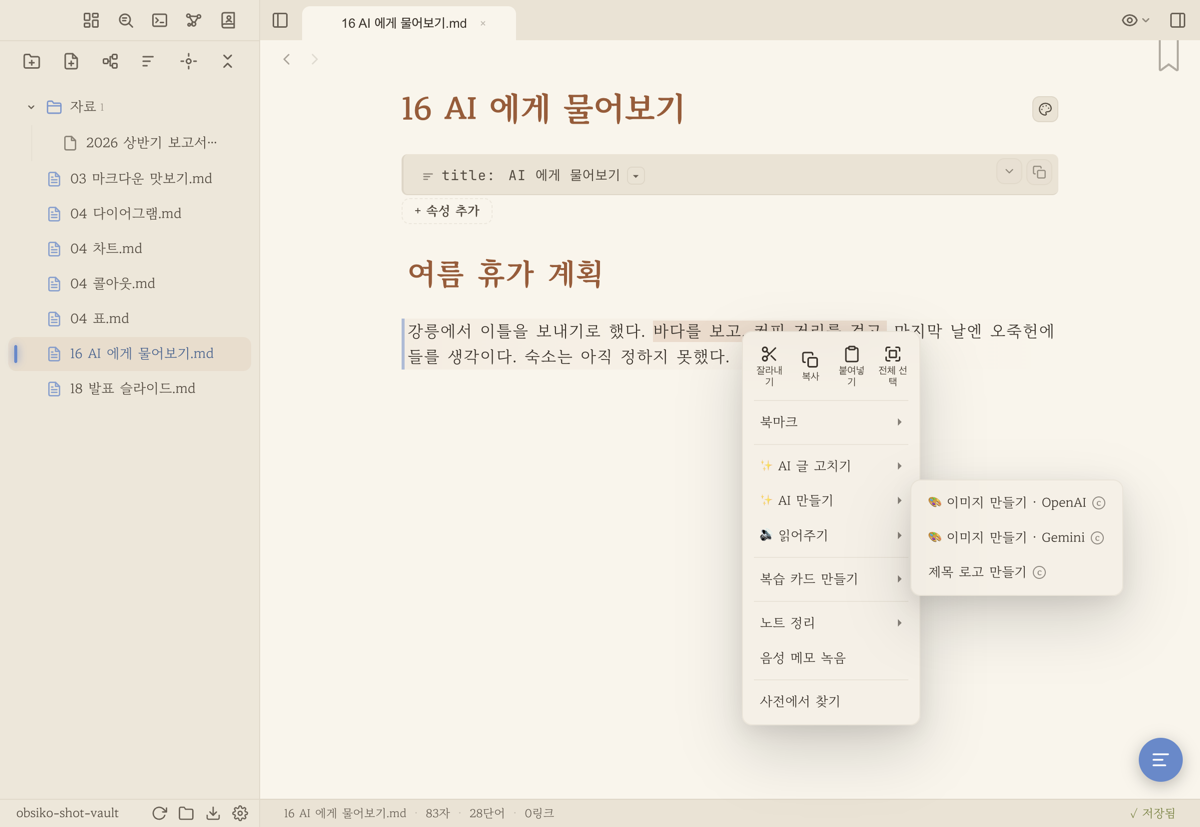
▲ Select a description, right-click → 'Create Image with AI'. The generated picture slots in right below the selected text.
🔊 Read aloud (TTS) — two paths: listen free, or make an audio file
Right-clicking the text gives you a dedicated '🔊 Read aloud ▸' group (with no selection, it reads the whole note). Three entries — Device voice (free), OpenAI, Gemini.
① Listen instantly with your device voice 🆓 (no key)
- Right-click ▸ '🔊 Read aloud' ▸ Device voice, or Command Palette 'Read Note Aloud' (device voice is the default there). It reads instantly with the voices Mac/Windows/iPhone/Android already have — no API key, nothing to install, no cost.
- Since no file is created, the playback bar changes accordingly: sentence progress (2/13 sentences) instead of a seek bar, plus play/pause, speed, voice and sentence highlighting. Resuming after a pause restarts from the beginning of that sentence. Even on a narrow phone screen the bar stays a single line — when space runs short it folds the least important bits first (time, labels) rather than covering two lines of your text.
- Skip by sentence ◀◀ ▶▶: the buttons on either side of play rewind or skip one sentence at a time — since reading is sentence-based, one tap is exactly one sentence (paragraph breaks are just the next sentence). Pressing it while paused never starts the sound — it just moves the position, and the in-note highlight and the 2/13 counter follow along. When there is nowhere to go (the very start or end) the button dims.
- Picking a voice: the list shows only voices installed on your device for that language (English-named novelty voices like Eddy or Grandma are filtered out). Switching mid-play applies from the current sentence, and your choice is remembered.
- On Android they appear as Voice 1 · Voice 2 … — Android doesn't expose voice names (only internal IDs), so the app numbers them. Offline/online twins of the same voice are merged into one row, and only the ones that need a connection are marked · online. Voices you haven't downloaded yet are left out, since picking them would produce silence. The numbers are remembered per device, so downloading more voices later won't shuffle the one you use.
- ? help: press ? on the playback bar — it explains that this mode is not saved as a file, plus a tip: voices you download in your system settings show up in this list too. It shows the path for the device you're on (Mac/iPhone: Accessibility ▸ Spoken Content ▸ Voices / Android: Settings ▸ Accessibility ▸ Text-to-speech ▸ voice data). Restart the app after downloading to be sure.
- Right after launch some devices (iPhone especially) report their voices a moment late. Until then you'll see just 'Auto (device default)', and the rest fill in quietly once ready — reading aloud works either way.
- English mixed into Korean/Japanese, done right: many devices spell out Latin words letter by letter, so only the English runs are handed to an English voice (automatic, nothing to configure). That English voice matches the gender of your chosen voice — a male base voice gets a male English voice, a female one gets a female voice (when such a voice is installed).
- Sentence highlighting 🖍️ works here too — reading sentence by sentence, it's actually more accurate than AI narration (toggle with the highlighter icon).
② Make an audio file 💳 (AI narration — OpenAI/Gemini key)
- Right-click ▸ '🔊 Read aloud' ▸ OpenAI or Gemini turns that text into audio, saves it under assets/, inserts a [🔊 Listen] link, and plays it right away. Asking the agent to "read this note aloud" uses this path too. A Gemini key also works on its free quota.
- The playback bar lets you adjust voice selection, preview, play/pause, seek, and speed (0.75–2×). Set a default voice in the 'AI Voice' section of Settings, or specify one directly with "read this in the ○○ voice."
- Even long text starts quickly: it splits the text into chunks and starts playing as soon as the first chunk is ready, generating the rest while you listen. If the seek bar length keeps growing with a +, that means "still generating the later chunks"!
- Highlighting the sentence being read 🖍️: while playing, a subtle highlight follows the sentence currently being read in the editor, and the view scrolls along with it. Toggle it with the highlighter icon on the playback bar. If you need tighter sync, turn on 'Precise narration highlight sync' in settings (uses whisper re-transcription — requires an OpenAI key, extra cost).
Playback never gets interrupted (both paths) — move to another note or open the dashboard while narration plays and it keeps playing. The bar then shows 🎧 note name so you know what's being read, and clicking it takes you back to that note. Come back to the original note and sentence highlighting picks up again; if you edit the original text, only the highlighting quietly turns off (playback continues).
If you're not listening, it tidies itself away — when you leave the note while paused, finished, or still waiting for you to pick a voice, the playback bar closes on its own (no more stray bar on unrelated screens). Inside the note being read, nothing changes.
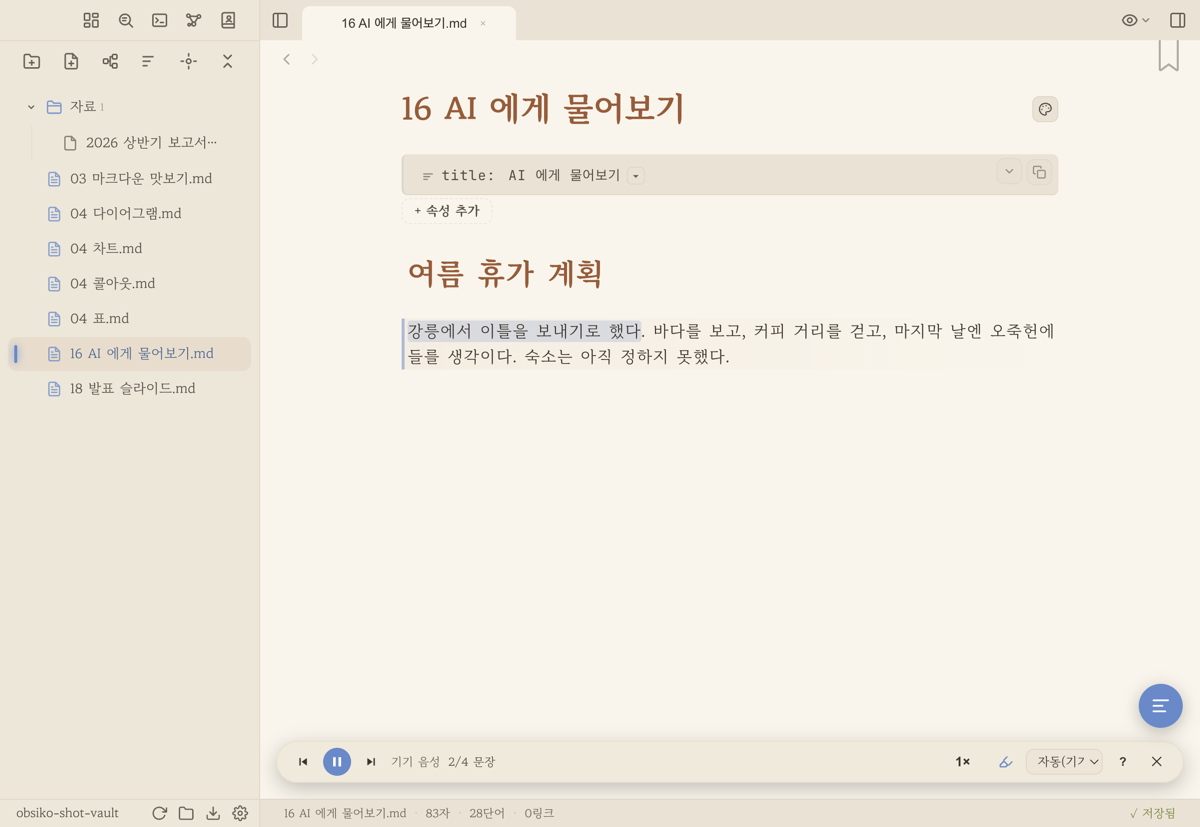
▲ The playback bar below the editor — voice selection, preview, play/pause, seek, speed, and the sentence-highlight toggle all in one row.
💡 Image generation, narration, and transcription are BYOK (bring-your-own-key) features that bill you per usage with each provider (OpenAI/Gemini). If you don't have a key, you'll get a prompt to add one.
Smarter search — semantic search & graph 🔎🕸️
The days of needing an exact keyword match are over! The agent searches by meaning and expands through connection structure.
- Meaning-based search (semantic): ask things like "notes similar to this" or "find everything related to this topic," and it finds notes with similar meaning even if the wording differs (strong with Korean nuance and synonyms). It indexes your vault locally, and automatically re-indexes only what changed whenever you edit a note.
- Lightweight GraphRAG: it uses the
[[links]]you've written and your ontology relations directly as a knowledge graph. It excels at questions like "find notes about X and map out the surrounding structure too" (find a seed → expand to neighbors) or "what clusters/topics do my notes fall into?" (see the overall grouping).
How to turn it on (semantic search needs a free embedding engine, once)
Semantic search requires a local embedding engine (either one, both free):
1. Ollama — ollama pull nomic-embed-text (easiest), or
2. Built-in — run npm i @huggingface/transformers in the app folder (fully self-contained, downloads the model once on first search)
In the panel's Options (≡) button → 'Semantic Search Embeddings' category (desktop), you can choose the backend (Auto/Transformers/Ollama) and model name. (Graph search needs no extra install — it works right away!)
No key needed on Mac — On-device AI (Apple Intelligence) 🍎
On a Mac with macOS 26 or later and Apple Intelligence turned on, you can use short AI tasks right on the Mac — no API key, no sign-in. Your text never leaves the Mac.
- What it does: AI spelling check · AI polishing · writing-check questions · transcript summaries, plus simple chats with the “On-device AI” engine in the agent panel. Note-editing tools, web search, and long critiques are deliberately left out — a small model tends to give plausible-but-wrong answers there.
- Engine order: an API key if you have one → otherwise an engine like Claude or Codex that you’ve already been using on this Mac → otherwise on-device AI. You can switch any time from the engine list in the agent panel.
- Don’t see it? If Apple Intelligence is off, the agent panel’s help (?) shows where to turn it on — System Settings ▸ Apple Intelligence & Siri, then come back to the app. It doesn’t appear on Intel Macs or macOS older than 26.
- A “Beta” badge means the on-device AI did it. It appears next to the engine list and the current engine name, on the spell-check result line (even when it says “no errors”), at the head of proofreading questions, on AI fix cards and in the recording clean-up options. Hover it and it says: “Still being tested, so results can be off — review before you rely on them. Nothing leaves the device.” On-device spell check may miss errors or suggest odd fixes, so for Korean especially, pair it with the Urimalsaem spell check.
- It’s the same feature as “On-device AI” on iPhone and iPad (iOS 26 or later).
- More dependable: replies stream in word by word and Stop halts immediately. Spelling and writing checks come back in a fixed format so suggestions that change the meaning or the numbers are filtered out, and long text is fitted to the device model's limit automatically. If the device can't handle the language (say, Korean), you're told before it runs.
Ready-to-use helper commands, no install needed 🎁
These come built in, no separate install needed. Just type / in the chat box to see helpers by category! (Most commands' official names end with a "helper" suffix, but as shown below, typing just the first part triggers autocomplete.)
- Writing — /draft /compose /craft /edit /revise /worldbuild /roleplay (become a character from your notes and act out a scene — try /roleplay character name, situation!)
- Study — /studynote /summarize /quiz /example /errorlog /lecturenote /studyplan /homework
- Research & papers — /gather /excerpt /paper /litreview /factcheck /synthesize (these helpers never assert claims without a source — if they don't know, they say so!)
- Docs for AI — /aidoc /claudemd /skill /command /persona /harness
- Zettelkasten & ontology — structure your knowledge with /permanent /connect /classify /relate /atomize /attribute, and more! → Details: 17 Structuring Knowledge
If you use the app in English or Japanese, command names switch to that language too — and it understands even if you type in a different language. 😊
One-touch LLM Wiki setup 📚
- Just say "build me an LLM Wiki" and the agent asks whether you want a quick or deep start, then sets up your knowledge base foundation in one go (from there it runs on feeding it material and saying "organize this," asking plain questions, and occasionally saying "check this over").
- The wiki is solidly structured around system files that capture the agent's identity, how it works, who you are, and its memory:
Soul.md— who the agent is (identity, mission, tone, behavioral boundaries)AGENTS.md— how it works (task rules)user.md— who you arememory.md— a memory of decisions and conventions you've settled on together (older wikis: hidden.memory.md)- Edit these files directly and you can reshape how the agent behaves, exactly the way you want!
Automatic Git integration for developers (optional) 🐙
- Just flip it on in the panel's Options (≡) button → 'git' category and the agent will automatically commit — and even push — every time it finishes a task! (It uses whatever Git credentials are already set up on your computer.) You can also connect a remote repo or create a GitHub repo right there. → 23 Settings & Themes
🚀 Learn more about usage (sub-pages)
These sub-pages dig deeper into real-world workflows, step by step. It's best to read them from top to bottom.
- 16-1 Basic Usage — the fundamentals of putting it to work + tips
- 16-2 Recipes by Scenario — writing, studying, research, structuring, conversion, mind maps
- 16-3 Writing & Composition — 6 step-by-step writing helpers
- 16-4 Building an LLM Wiki — building a knowledge base + using it like NotebookLM + readable file formats
- 16-5 Zettelkasten & Ontology — turning notes into connected knowledge
- 16-6 Recommended Prompts — copy-and-paste-ready prompts
- 16-7 Prompt Helper — building prompts from blocks + creating a harness (rules & commands)
- 16-8 Chat-only Mode (Mobile & Web) — use AI on iPhone and web with just an API key (web search, image viewing, note organizing) 📱
- 16-9 AI Billing Guide — what counts as subscription vs credits, and how to create API keys 💳
- 16-10 AI Sources & Privacy — verify an answer's sources ([S1], evidence list) and choose what to hide from the AI 🔍🔒
- 16-11 Personal Memory — let the AI remember you so you don't re-explain your preferences and context every time 🧠
- 16-12 Writing Helper — a structure check, questions that deepen your thinking, and editor-style coaching through 10 genre lenses ✍️
← Previous: Routines · Home · Next: Basic Usage →