 ObsiKO
Mind Map
Lay out cards, shapes, and arrows freely across a vast infinite canvas, and spread your tangled thoughts out in the open! And yes, it's fully compatible with Obsidian's Canvas (
.canvas) format too. 😎
← Back home: ObsiKO 101
Opening a new canvas / revisiting one 🎨
- Click the New Mind Map button in the top left to create a blank
.canvasfile. (It's created in the same place as when you make a document — see Getting Started) - Click a
.canvasfile sitting quietly in the file tree, and — ta-da — it renders and opens as a mind map view.
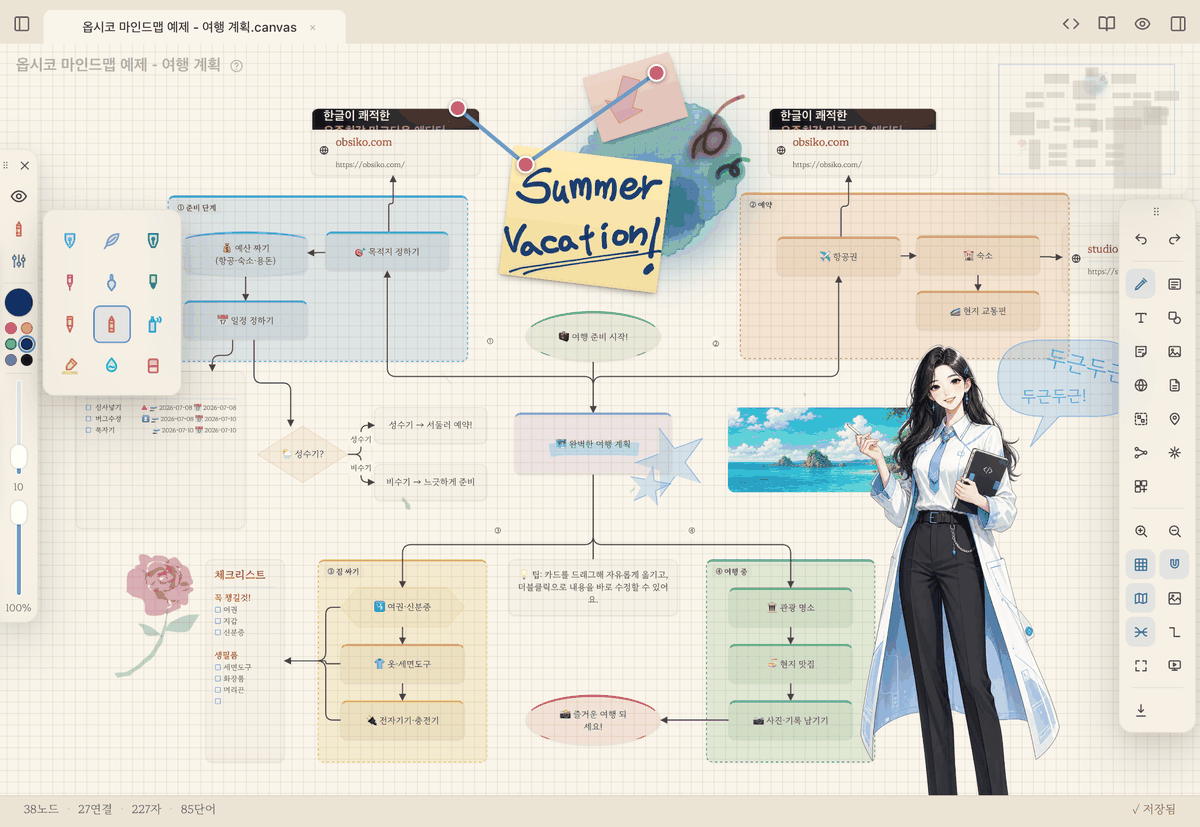
▲ Lay out cards, shapes, and arrows freely on an infinite canvas! (Compatible with Obsidian Canvas)
The many kinds of nodes (cards) that fill a canvas 🗂️
- Text cards / file cards (pull in your own notes) / link cards (web addresses) / and even groups to bundle things together!
- The toolbar's 'Note card (search)' finds every document you can drop in — not just notes (
.md/.txt) but mind maps (.canvas), data tables (.base), and PDFs. No need to drag anything: search by name and in it goes (images, video and audio stay with the Media card tool next to it). - Note cards show the pictures from the note too 🖼️: an
in the note (Obsidian's![[image.png]]works as well) appears right where it belongs, between the lines, inside the card. Cards are small, so only the first 4, scaled to the card's width. They come along in mind-map cards embedded in other notes and in image exports too. - Paste a Google Maps address and the card shows the map 🗺️: if it's a link copied from the browser's address bar (one with
@latitude,longitudein it), the card carries a picture of that spot and the place name. An address that only names a place (including the short "Share" link) can't tell us where to draw, so you get the link with no picture — we'd rather show nothing than pass off the wrong neighbourhood as your place. (In the web-browser edition the picture is skipped too.) Paste the same address into a note and you get a live, movable map instead. - Plain text (label): for when you just want clean text with no border! Double-click to start typing right away.
- Shapes: clean, text-free shapes — 45 of them! From basic shapes (circle, triangle, rectangle, polygon…) to arrows (up/down/left/right, bidirectional, elbow, curved, U-turn, rotated), speech bubbles / thought bubbles / cloud bubbles, stars, bursts, sparkles, people (stick figures, torsos), and even cubes, lightning bolts, water drops, crescents, and hearts.
- Auto mind map: hit the Auto Mind Map button in the toolbar, and it automatically spreads out nodes following the
[[links]]of the note you picked as the center. → Wiki Links & Tags - Pressing the button first pops up a small options window — tick ☑ Include backlinks (notes that point to this note) and/or ☑ Two levels (the links of the linked notes too), then hit Create! Your choices are remembered and shown again next time.
- Chart cards 📊 · one-page summaries: put a note containing a
```chartblock on the canvas and the card shows the actual chart instead of the JSON. That lets you lay out a one-page summary — a title, the key numbers, and several charts side by side — with no new syntax to learn: write the chart into a note, drop the note on the canvas, done. Ask the AI to "sum up this quarter on one page" and it builds exactly this. Chart colors follow theme changes, and if the chart data is broken the card falls back to the normal text preview instead of breaking. → Advanced Markdown - Base mind map 📊: drop a Bases (
.base) file onto the canvas and it slots right in as a file card. Select that card and press the toolbar's Auto Mind Map button — a picker for the boards (views) inside the base pops up, and the board you choose expands into a whole mind map! Boards that group by status (project · PARA · library) get wrapped in colored group boxes, aligned in a grid like a kanban (center = the base card, with a "column" per status below it), while flat views like a table lay their cards out in a tidy grid. If there are a lot of items (more than 80), they're split fairly across the groups and the leftovers are shown as a+N more…card. You don't even need to place a card first — with nothing selected, press the Auto Mind Map button and the file list that pops up includes.basefiles too, so pick one and it drops a base card in the middle of the screen and expands it right away. → Bases (Data Tables)
Bend it to your will 🕹️
- Grab a card and drag it around, or grab a corner and stretch its size up and down!
- Spin it around 🔄: select a card and a rotate handle appears above it, letting you turn it. Plain text (label), shapes, and sticky notes can all rotate — and now image cards can rotate too! (Even after rotating an image, the arrows connected to it snap precisely to the rotated corners.)
- Shift tricks: hold Shift while resizing to keep the original aspect ratio as it grows or shrinks. Hold Shift while moving to lock movement to a straight horizontal/vertical line. And for rotation, Shift snaps you to 15° increments.
- Grab a card's port (connection point) and pull it over to another card to drop it in place, and you'll get a sturdy arrow connecting them.
- On mobile the ports are bigger, with a finger-sized touch area around them. Tap a card first to select it and its ports appear — and the touch area stays finger-sized even when you're zoomed out. 👆
- The mini toolbar that pops up on selection 🎨: select a card or an arrow and a small toolbar appears above it. Press the color button to open the color palette (color selection is folded into a single button, so even on the iPhone's narrow screen nothing — not even the delete button — gets cut off!); for a colour outside the presets, the palette icon in the last slot opens the Colors panel (colour wheel), and use the background opacity slider to gently tint a card's or shape's background. If you selected a shape, pick its outline style (solid · thin · thick · dashed · dotted) right here; if you selected an arrow, change its line style — 12 of them (solid · thin · thick · dashed · dotted · double · elbow · wavy · sketch · a squiggly, scrawled-by-hand line · small zigzag · large zigzag) and arrowhead direction.
- Try dragging an image or file onto the canvas, or copy-pasting one in. It slots right in as a card! (Works on iPhone too!)
- Right-click (PC) or press and hold (mobile), and a bunch of handy magic menus pop out.
- Magnet, grid, and fit-to-view: click the Grid button in the toolbar to choose (or turn off) a dropdown of small grid · large grid · dots · isometric (triangular grid). Dots draw only a point at each intersection instead of lines — much quieter, so your cards and connections stand out. Turn on Magnet and cards snap right onto the grid, making alignment a breeze; the Fit to View button (or a middle-click) gathers everything scattered about into one screen.
- Bookmark 🔖: keep a mindmap you open often with the bookmark ribbon at the top right (the same spot as markdown notes and Bases). The ribbon goes light or dark to match the background — light on a blackboard, dark on a whiteboard. → 07 Search & Navigation
- Minimap 🗺️: the small map in the bottom right shows the whole canvas layout plus the area you're currently viewing (blue outline). Click or drag the minimap and the view zips right over to that spot! It really earns its keep as your canvas grows (toggle it on/off with the toolbar's Minimap button — smooth touch-drag support on iPad too).
- 📱 On iPhone it sits small in the top right — mostly staying very faint (transparent) so it doesn't crowd the narrow screen, and only becoming crisp while you're holding and moving it.
- Branching out (Tab / Enter) 🌿: select one card and press Tab to spawn a child card connected by an arrow, or press Enter to spawn a sibling card sharing the same parent — and typing starts right away, letting you brainstorm with just the keyboard! On touch devices, long-press a card and use the menu's 'Create Child Card (Tab)' / 'Create Sibling Card (Enter)' to do the exact same thing.
- Turn a card into a note 📝: right-click a text card (long-press on mobile) and pick 'Convert to note' — a
.mdnote holding the card's content is created in your vault, and the card turns into a note file card right where it sat (position, size, and connected arrows all kept!). When you're brainstorming freely on the canvas and think "this card deserves to grow into a proper document," you can promote it to a note on the spot. The note's title is taken automatically from the card's first line. - Duplicate & Lock 🔒: from the right-click (long-press on mobile) menu, Duplicate makes an identical copy of a card in a snap, and Lock pins a card in place — a little padlock appears and moving, resizing, rotating, editing, and deleting are all blocked so you won't nudge it by accident (you can still select it). Right-click again → Unlock. And this menu only shows the items you can actually use right now, so it always stays tidy.
- Auto tidy (7 layouts) 🪄: even cards you scattered freely snap into a clean tree with one press of the Auto Tidy button on the toolbar. Pressing it opens a shape menu — Radial (spreading out from the center), Logic (right) (great for outlines/hierarchies), Org chart (down) (top → bottom), Balanced (the classic mind map shape most people picture), Timeline (left → right order), Fishbone (an Ishikawa cause-analysis diagram), and Matrix (a comparison grid). Cards must be connected with arrows to tidy, and the center is the card you selected (one) or the card with the most outgoing arrows. Your last-picked shape is remembered for next time.
- 💡 Auto tidy only rearranges when you press it — it never shuffles things around while you place cards or draw, so enjoy free placement and freehand drawing to your heart's content and tidy only when you want.
- Drop in a template (11 of them) 📋: press the Template button in the toolbar to lay a ready-made structure down in the center of the screen, all in one go — save yourself the board-building time!
- SWOT analysis (2×2 quadrants) · Kanban board (To Do · Doing · Done, 3 columns) · Timeline (5 stage cards linked by arrows)
- Mandal-Art (9×9, 81 cells — a core goal in the very center, sub-goals in the 8 cells around it, each sub-goal feeding into the center of an outer block where you fill in the action plan)
- 5W1H (walk a topic through Who · What · When · Where · Why · How) · Logic pyramid (main claim → supporting reasons) · Ki-Seung-Jeon-Gyeol (the four-part story structure: intro · develop · turn · conclude)
- Eisenhower (2×2 — sort tasks by urgent/important: do now · schedule · delegate · drop) · KPT retrospective (Keep · Problem · Try) · OKR goal map (objective → key results → tasks) · Cornell notes (the three-pane cues/notes/summary method)
- Presentation mode 🎞️: press the presentation button in the toolbar and it zooms into your cards one by one, in the order the arrows connect them. →/Space = next, ← = previous, Esc = exit. Your mind map becomes a presentation, just like that.
- Change up the background: click the Background button in the toolbar to choose from more than the default — pick moody backgrounds like corkboard, blackboard, gray, whiteboard, kraft paper, or canvas (fabric). (Cork, kraft paper, and canvas are real photographic textures!)
- Text color adjusts automatically: on a dark blackboard background, cards and text turn bright; on light whiteboard/canvas backgrounds, they turn dark — always staying legible. (Cards/text with a manually chosen color keep that color as-is!)
- Subtle vignette: the edges of the screen darken slightly, helping you focus on the workspace in the center (this is fixed to the screen — it doesn't move around or appear in exports).
Sketch by hand — freehand drawing ✏️
Click the Pen button in the toolbar and a drawing toolbar opens on the left of the screen. Draw and jot notes freely right on top of your cards.
💡 These same pens work inside your note body too — drop a hand-drawing right at the cursor while you write, with inline drawing → 04 Advanced Markdown
- A whole lineup of pens: soft pen, rough pen, liner, flat pen (calligraphy), brush, sign pen, pencil, crayon, airbrush, highlighter, blend brush, and even an eraser!
- Brushes with personality 🎨: the sign pen has that felt-tip feel — a steady width with ink that subtly bleeds depending on how fast you stroke; the crayon lays down thick, bold lines with a waxy texture (press harder and it gets darker!); the airbrush is a genuine spray effect whose edges spread softly into the distance (pressure controls both density and spray width together — the spread carries over on iPad too!); and the blend brush smudges colors you've already laid down to blend them airily together.
- The Liner reacts strongly to drawing speed — draw fast for a thin line, draw slow for a thick one. Wrist speed alone gives you calligraphy-like variation in stroke weight. ✒️
- The Pencil adjusts in much finer steps — each notch on the slider moves the width just a little, and even at maximum it tops out at a pleasantly thick pencil. Thick strokes get a crumbly, graphite-like edge, and wide strokes pick up a grain that follows your stroke direction — so layered shading darkens naturally instead of looking angular. ✏️
- Color & eyedropper: pick a color from the palette (six slots, in a 3×2 grid of large swatches — folding down to 2 columns on narrow mobile screens) — pick a slot and change its color, and it saves to that slot, building your own custom palette. Use the eyedropper to pull a color straight from a stroke you've already drawn (background color is ignored).
- Drag-and-pour fill (color drop) 🪣: just like Procreate, drag a palette color onto your drawing and any area enclosed by lines fills right in! The fill sits behind the strokes, so the edges stay clean, and it automatically patches small gaps. Drop a different color onto an already-filled area, and only the color changes.
- Filled areas act as both wall and floor 🧱: draw a shape on top of a filled area and pour color into it, and only that inner part gets refilled — or use the edge of a filled area as a wall to fill the outer region. As long as it's enclosed, whether by shapes or by lines, it fills!
- Adjust thickness: use the slider to change stroke thickness, or press
[and]to decrease and increase it. A circle around your cursor previews the thickness live. - Flat pen angle: pick the flat pen and press the button a second time to adjust the nib's tilt angle (for that calligraphy feel!).
- Much finer pressure and tilt sensitivity ✍️: the pressure from your iPad Apple Pencil, a desktop pen tablet (Wacom, etc.), or an Android S Pen — from a feather-light touch all the way to a firm press — comes through with real range. Each device's pressure characteristics are tuned separately, so even the lightest stroke from any pen stays crisp and doesn't smear. Tilt the pen (angle it low) and brush/pencil/crayon lay down wider, rougher strokes. (Two-finger gestures pan/zoom the view.)
- Pen side button = temporary eraser 🧽: hold down the side (barrel) button on a Wacom pen or S Pen while you rub, and it erases immediately without switching tools (let go of the button and you're back to your original pen). The inverted eraser tip on a Wacom pen works the same way.
- Two drawing layers: you can draw on two layers — above and below the cards. Use the two eye buttons in the toolbar to show/hide each one, and click a layer's name to pick which layer you're currently drawing on (pick a hidden layer and it automatically becomes visible again).
- Move the toolbar wherever you like: drag the ⠿ handle at the top of the toolbar to reposition it, or use the minimize button to collapse it (its position is remembered).
- 📱 On iPhone, the default toolbar is docked at the bottom: icons appear in a neat row along a bottom bar. Tap the small arrow tab above the bar to slide it out of view, leaving just the tab so you can use the canvas at full width (tap again to bring it back — its state is remembered).
- Hold to shape ✨: just like Procreate — draw roughly, then pause without lifting and the stroke settles into a straight line or a smooth curve. Loop around and bring the end back to the start, then pause, and you get a circle or an ellipse ⭕ — a roughly round loop snaps to a true circle, a flat one keeps its proportions and tilt, and the leftover gap closes up. A 'Line'/'Curve'/'Circle'/'Ellipse' badge pops up so you know exactly what changed, and you can keep holding and move to resize — circles and ellipses grow and shrink with the far side pinned in place, keeping their round shape and proportions. Don't like it? One ⌘Z. (Toggle it in the stroke-smoothing popover.)
- 💡 Magnet only aligns cards — it never touches lines you draw by hand; they stay exactly as drawn.
- Lasso (L) 🪢: turn on the lasso button to choose between 'Select' and 'Paint' modes. Select (default) lets you lasso strokes to move or delete them together; Paint fills the enclosed area with the current color — and the opacity slider applies as-is, so translucent wash effects work too (you'll see a live preview as you lasso). The lasso and drawing tools are mutually exclusive — picking a tool turns the lasso off, and turning on the lasso rests the tool.
- Tool shortcuts:
P= cycle pens ·B= brush/pencil/blend ·S= sign pen ·H= highlighter ·C= crayon ·A= airbrush ·E= eraser ·I= eyedropper ·L= lasso. (Press Esc or right-click an empty area to exit.)
Sketch → AI image 🎨✨
Turn a rough sketch into a finished picture drawn by AI! It keeps your composition, pose, and layout, so you can get the scene you want regardless of drawing skill.
- How to open: on a canvas with drawings, right-click an empty spot (long-press on touch) → 'Draw from sketch (AI)…'.
- Draw from a card's text 🃏: no sketch needed — right-click a card with text (long-press on touch) → 'Draw from card (AI)…'. The same window opens with the card's text already in the description box. Add a style ("watercolor", etc.) and press [Generate] — the picture is attached as an image card on that card's branch (to the right), joined by an arrow. Handy for turning character or place cards into pictures one by one.
- Pick your options: the model — 6 of them (🍌 Nano Banana 2 · 🍌 Nano Banana (both Gemini) · GPT Image 2.5 Flare (fast) · GPT Image 2.5 Sunburst (more precise but slower) · GPT Image 2 · GPT Image 1), the size (square, landscape, portrait — the aspect ratio applies to every model!), the quality (gpt-image only: low/medium/high — higher costs more), plus a request ("in watercolor style", "night background", etc.) — then hit Generate!
- The finished image is saved to assets/ and dropped onto the canvas as an image card. Your sketch stays untouched, so feel free to generate several versions and compare.
- 🔑 You'll need a chat API key (Gemini or OpenAI) → 16-9 AI Billing Guide (Subscriptions vs Credits). If you use the AI agent on desktop, the Send to agent button lets you refine it conversationally ("make it bluer!").
💡 This works exactly the same in inline drawings inside your notes — right-click the drawing pad, or right-click a saved drawing image → 'Draw from sketch (AI)…'. The finished picture is inserted into the note right below the drawing. → 04 Advanced Markdown
Map mode — draw on a grid 🗺️
Need a game map, dungeon, floor plan, or village map? Turn on map mode with the Map draw button (right next to the drawing button) and the canvas becomes a tiled grid map board.
- Four styles (parchment 📜 · grid paper 📘 · marker board 🖍️ · RPG illustration 🌿), a 20-terrain brush and fill, walls/doors/secret doors with auto-wall, a track tool connecting roads, rails and rivers (road + rail = a station!), 41 stamps with note links, and sticky memos — the full guide lives in its own chapter! → Map Drawing
- The map is saved with the canvas file and included in PNG/SVG exports and the minimap too.
Drawable memo pads — sticky notes 🟨
- A sticky note is a "memo pad" you can freely draw on and erase. Rotate or resize a note, and whatever's drawn inside it changes right along with it.
- Drawing that starts on top of a note stays with the note; drawing that starts on the background stays only on the background.
Turn arrows into real relations — ontology links 🧩
If you've drawn an arrow between two note cards, you can make that arrow a recorded relation, not just a picture.
- Select the arrow and a relation button appears in the inspector (only for note↔note arrows). Press it and predicate suggestions pop up — ranked from your relation dictionary and what your vault actually uses. Pick one and the source note's properties get
predicate: "[[target]]", with the predicate written on the arrow's label too. Not in the dictionary? Use "Type your own…". - From that moment the relation shows up in the Connections panel, Graph view, and Bases rollups. The structure you drew on canvas becomes your semantic network.
- Notes that are already related connect themselves — place two related notes on a canvas and a faint dashed line with the predicate appears automatically (display only — never saved to the file, never exported). Draw a real arrow and the dashed one steps aside.
- Recording is one-way: the note owns the relation, so deleting the arrow keeps the relation (tidy up in the Connections panel). Text and shape cards have no properties, so they're not eligible.
- Auto Mindmap understands relations too — notes referenced by the center note's relation properties (author,
parent_area, etc.) are laid out as cards, connected with dashed lines + predicate labels (body links stay solid arrows). Run it on an Area note with "Include notes pointing here" on and every project pointing at that area unfolds at once — an instant PARA map.
Pin things down 📌
- Turn on Pin mode and double-click an empty spot (double-tap on mobile) to drop a pin. Pins always render at the same size, regardless of zoom.
- Right-click drag from one pin to another (on touch, long-press a pin and then drag) to create a straight line connecting them. Both pins and lines can have their color changed.
Export it beautifully 📸
- Turn your carefully-crafted mind map into all kinds of formats! Export as PNG (transparent background) · JPG (background included) · SVG · PDF · copy to clipboard · or a screenshot. On iPhone, it's saved straight into the vault.
- Rotated cards, pretty shapes, plain text, and even your hand-drawn strokes — everything gets captured in full quality, without exception.
More ways to use it — ideas for the infinite canvas 🎨
It's called a "mind map," but really it's an infinite canvas for laying out anything. Here are some other things you can build with the same tools.
🖼️ Moodboard
- Drag in images that inspire you (drag-and-drop or paste) and arrange them freely. → Image cards come in clean, with no frame, and can even rotate, so you can overlap them at an angle for a collage look! (No photos handy? Drag them straight in from the Image Search panel → A Tour of the Screen)
- Change the background to corkboard, blackboard, etc., group things into clusters by mood using groups, and scatter keywords with frameless labels — and your moodboard is complete!
- Organize color palettes and tones with shapes and color, then export it as an image to share once you're done.
✏️ Idea Sketch
- Quickly jot down what's on your mind with freehand drawing (pencil, brush, pen). Organize it later! → See "Sketch by hand — freehand drawing" above.
- Jot handwritten notes on sticky notes and spread them out, rotating and moving as you go. Throw down cards, shapes, and arrows as ideas come to you, and refine them later.
🕸️ Network Graph
- Draw a network of people, concepts, or events by treating cards as nodes and arrows as relationships. Just pull a port from one card to another to connect them!
- Put actual notes onto the graph as note cards (files), and you get a "living" graph you can click straight into.
- Want to auto-expand a note's
[[link]]relationships? Use the Auto Mind Map button! You can also view your whole vault's network as a constellation in Graph View.
🧠 Concept Map
- Where a mind map goes "center → branches," a concept map is a web that connects concept to concept with named relationships.
- Connect cards (concepts) with arrows, and attach a label to each connecting line (e.g., "includes," "causes") to make the meaning crystal clear! If there's a hierarchy, arranging things top-to-bottom makes it easier to read.
- For more rigorous, typed structuring, pair it with ontology on the note side. → Structuring Knowledge
💡 Whatever the purpose, it's fast to ask the AI Agent to sketch a first draft: "Make me a moodboard/network/concept map from this material" → Recipes by Scenario
Keep this in mind! 💡
- Plain text and shape nodes are ambitious features ObsiKO built on its own, and they're not yet part of Obsidian's standard Canvas syntax. So don't be surprised if they don't show up when opened in Obsidian!
- You can also ask the smart AI Agent to draw you a mind map. Pretty neat, right? → AI Agent
- And the reverse works too: draw a canvas and have the AI build folders and organize files to match! Sketch the structure or work order and just say "do it according to this canvas" → AI Agent
← Previous: Graph View · Home · Next: Map Drawing →