 ObsiKO
Search & Navigation
No matter how mountainous your knowledge vault gets, don't worry — ObsiKO will find the note you're after in a flash! ⚡
← Home: ObsiKO 101
Everything by name! Command Palette (⌘P / Ctrl+P) 🎛️
- Just like Obsidian, this is an all-purpose window that lets you find and run any feature by name. Click the palette button right next to the search button in the top left, or open it with
⌘P(Ctrl+P). - Can't remember where "Export? Graph View? Settings?" lives in the menus? Just type part of the name and run it right away! It even shows the current shortcut alongside each item.
- In fact, typing just
>at the start of the full search box (⌘⇧F) switches it into command mode too. 😉
Zip! Quick Open (⌘⇧P / Ctrl+Shift+P) 💨
- Press the shortcut and type just part of a filename, loosely. It'll figure out what you mean (fuzzy search) and open it right away.
- Full support for initial-consonant search! No need to type out
한글in full — justㅎㄱfinds it perfectly. That's ObsiKO's touch of smarts!
Not sure where to go? — Random note 🎲
- Open the search window without typing anything, and the top row of the list is 🎲 Open random note. Press it and one of your notes opens at random — a little serendipity with writing you'd forgotten about!
- It's in the command palette (⌘P) too, as Open random note (searching "random" finds it). The note you're currently reading is excluded from the draw.
Dig through every corner! Full Search (⌘⇧F / Ctrl+Shift+F) 🔍
- Digs through the actual body text of every file in your vault to find what you need. (In fact, Quick Open and Full Search are the same unified search box — whichever shortcut you open it with, it searches filenames and body text together on one screen!)
- It reads multiple files at once and caches smartly, so it's remarkably fast. And if there are too many results, you can coolly cancel partway through!
- Each result row leads with the file name, followed by a short vault-relative folder path — and when space runs short the folder shrinks first, so the name you actually care about never gets clipped or pushed onto a second line.
Search operators — pinpoint the scope 🎯
Mix these into your query (all combinable, instant, no AI calls):
- #tag — only notes carrying that tag · path:folder — only notes whose path contains it
- since:lastweek, before:2026-07-01 — filter by modified date (today, yesterday, thismonth, 3d, 2w…)
- -word — exclude notes containing that word
Example: #idea obsiko since:lastweek. Applied filters show in the status line.
Can't recall the exact word? Search by meaning 🧭
"That note… what did I call it? 'Focus'? 'Flow'?" This is for exactly that. Search from the full-search box the way you always do, and a "Found by meaning" section quietly appears below your familiar results.
- The words don't have to match — if the meaning is close, it turns up. Search
how to focusand a note titledgetting into flowcomes along for the ride. - Each hit carries a semantic match %. Rather than cluttering the list with things that are vaguely similar, we only surface the ones that genuinely stand out.
- Your keyword results are never disturbed. Nothing is reordered or interleaved — the section is only ever appended below, because losing the spot you were just scanning would be worse than helpful. Don't need it? Ignore it and keep to the top. 😉
A one-time setup: build the index 🏗️
At first you'll see "Index your notes first to search by meaning" and a [Build index] button. Click it and ObsiKO scans your vault (a few minutes for large vaults). After that it only re-indexes what changed.
- Indexing runs on your own computer (it needs one free local engine — Ollama, or the app's built-in option). For setup → AI Agent
- It works on phone, iPad, and web too! On mobile it asks once whether to download the search model (~110 MB); say yes and from then on indexing and search happen on your device (nothing leaves it).
🔒 Notes protected with
ai: denyare never indexed, so they don't show up here either (keyword search still finds them as usual). → AI Sources & Privacy
"What's my vault even about?" — topic clusters right in search 🧩
Type a whole-vault question — something like overview, themes, or (in Korean) 볼트 전체 / 무슨 주제 / 큰 그림 — into the search box and an [Explore the whole vault] button appears as a single row at the bottom of the results. Press it and, instead of individual notes, a 'Related note groups' section gets drawn — thematic clumps computed automatically from your link-and-tag network (zero AI calls). Unfold a group to see its notes and click to open them. Same data as the dashboard's Topic clusters 🧩 card. → Dashboard
- 💡 The button responds to phrasings like 'overview' and 'theme(s)', plus the Korean equivalents (note/material/record + whole/all, what/which + topic/theme/flow, 'big picture', 'overall'). It also quietly shows up when the semantic results all come out flat and there's nothing worth picking.
You won't lose what you found 🧷
Searching isn't a one-shot thing. You open one hit, decide it's not it, open the next… so ObsiKO never throws your results away carelessly.
Close it, reopen it, same list
- Opening a result closes the search box. Press
⌘⇧Fagain and your list is right back — the query, the row you were on, even where you'd scrolled. - It's restored, not re-run, so there's no waiting at all.
- It only searches again if you added or deleted notes in the meantime. Editing body text leaves the list alone — opening a result, editing it and coming back is the most common flow of all! 😉
- Works the same on phone, iPad and the web.
Keep results beside (desktop · iPad · tablet) 📌
Want several results parked where you can go back and forth? With results on screen, press 'Keep results beside' below the search box.
- The list moves into the right sidebar. Now clicking a result to open a note no longer makes the list disappear.
- Filename hits and body-text hits get their own sections, and when several lines matched inside one file they're grouped into a single card that tells you how many.
- If notes get created or deleted in the meantime, we'll tell you the results may be out of date. We never quietly reshuffle the list.
- To change the query, use 'Edit search' in the panel to bring the original search box back. (We deliberately didn't build a second search field — you'd never know which one to type in.)
- It works on iPad and Android tablets too. Pin the right sidebar (📌) and the list really does dock beside the editor; even unpinned, the screen is wide enough that your text stays visible next to the list.
- Only phones hide the button. On a narrow screen the sidebar covers the whole display, so "beside" simply wouldn't be true. Close-it-reopen-it above works everywhere, though.
Jump straight to the word you searched for 🎯
- Click a body-text hit and you don't just land on the line — the cursor lands right on the search term, which flashes briefly. No scanning a long line wondering where it was.
- If the word appears several times on that line, every one of them is marked.
Clear just the query ✕
- The ✕ to the right of the query empties the text while leaving the window open. You're back at recent searches and bookmarks, ready to type something else straight away. (Same in the command palette.)
- On Android there's a microphone next to it too — you can search by voice. → Platform Guide
Marking places to come back to — Bookmarks 🔖
Collect the notes you open often, and mark where you stopped reading in long ones.
Bookmarking a note — one star
- Press the bookmark ribbon at the top-right of the editor. That's it — it stays put even as you scroll. Also the command palette, right-click in the file list, or right-click in the text ▸ Bookmarks — and you can assign a shortcut under Settings ▸ Shortcuts if you like.
- Bookmark a heading or a specific spot, and a small bookmark appears at the end of that line — you can see what you saved while reading.
- Bookmarked notes gather at the top of the file list, and at the top of
⌘⇧Ftoo. - They follow renames and moves, and drop off the list when you delete the note.
- They travel between devices — they live inside the vault, so every phone, tablet and computer that opens the same vault sees the same list.
Too many bookmarks? Group them
- Drag a bookmark onto a group to file it there. Drop it on the "Bookmarks" label to take it back out.
- To make a group: right-click a bookmark ▸ Group into a new group, or the + next to "Bookmarks" (starts empty). Like a new folder, you name it right there, in place.
- Dragging awkward? The groups are in the right-click menu too.
- Right-click a group name to rename or ungroup. Ungrouping keeps every bookmark — only the grouping goes away.
Where you left off — for reading long pieces
- At the spot where you stopped, right-click ▸ Bookmarks ▸ Mark this as where I left off.
- Next time you open that note, a "Back to where you left off" line appears under the title. Press it to jump there.
- It never takes you there on its own. Going is your call. It stays quiet if you're already nearby, if you already answered once, or if you deleted the part you marked.
- One mark per note.
💡 Bookmarks and "where you left off" are different. A bookmark answers "which note?", the mark answers "where do I continue?".
Reopening a note puts you back where you were
Even without marking anything, reopening a note returns you to the last line you were looking at. Nothing to set up, nothing to learn.
Importing Obsidian bookmarks
Coming from Obsidian? Run Import Obsidian bookmarks from the command palette. Your groups come across intact, and running it again won't duplicate anything. (We never write to Obsidian's own file — if both apps are open, whichever saves last would wipe the other's bookmarks.)
Find and replace in this note (⌘F / ⌘⌥F) 🔁
- Find a word within the document you're currently editing and swap it for something else in one go. Open the small find box with
⌘F(or⌘⌥F) and move between results with next (Enter) and previous. - Use Replace and Replace All to swap out found text in one shot! Try the options below the find box too (smart choices tailored to writing in Korean):
- Match case — distinguishes English
Apple/apple - Whole word — matches just
사과on its own, not the사과hiding inside사과나무 - Match any word — matches any one of several space-separated words
- Ignore spacing — typing
한 국어still finds한국어(perfect for text with inconsistent spacing) - Wildcard character (
?) — matches?against any single character, e.g.1?월 - Press
Escto close. (Searching the whole vault is the Full Search ⌘⇧F above — this one is for finding things within the current document only.)
Write while you peek — the Reference View panel 🧐
- Other notes, images, even PDFs or video! Pin them right there on the right side of the screen while you write. This one panel alone can send your productivity through the roof.
- Drag any file you want to view over toward the right side panel. (Drag all the way to the edge of the screen and the panel opens right up on its own!) You can even drop files from your own computer to view them.
- PDFs can be scrolled through and zoomed in and out freely! Images — including SVG vector images — preview crisply too.
- Play YouTube, external video, and music right here! Right-click any YouTube, Vimeo, SoundCloud, or Spotify media in your notes (or use the player's ↗ button) and choose 'Open in Reference View' to view it full-size in this panel. → Advanced Markdown
- Open a video or audio file (vault or external), and a 🎙️ 'Transcribe' button appears next to the filename. Click it and the speech is transcribed into a note for you (the note carries the sound file itself as a playback bar at the top, so you can listen back while you read) — on iPhone/iPad free on the device (audio), otherwise by AI (a summary plus a full transcript appendix! An API key is needed when on-device transcription isn't available → AI Agent)
- For recordings with more than one voice, such as meetings, it also labels who said what — like
[0:06] **Speaker 2**: …. A solo lecture or memo stays clean, with no labels at all. Replace 'Speaker 1' with a real name in one pass and it reads even better. (This is when audio is transcribed with an OpenAI key. On-device transcription cannot tell speakers apart, so the transcription-method prompt tells you which option does.) - Watching a video and spotted a scene you like? Use the Capture button to grab the current frame and drop it straight into your document as an image.
- Open a vault image in Reference View and an ✎ Edit button appears next to the filename. Click it to instantly open the right-click editing menu (rotate, flip, crop margins, filters, resize, format conversion, background removal…) — great for touching up images easily even on mobile, where right-clicking is a hassle. Background removal now handles photos too — when the background isn't a solid color, it switches to on-device AI subject isolation automatically (iPhone iOS 17+, Android, Mac — free, on device).
Mind maps & bases, right beside you 🗺️📋
.canvas (mind maps) and .base (data views) open in Reference View too — look at a mind map while writing it out in prose, or keep a project board, ledger, or library beside your draft.
- Right-click a file in the tree → Open in Reference View, or just drag it toward the panel.
- It's a read-only snapshot, so there's nothing to break by accident. Want to really edit it? Hit ⇄ swap — that file comes into the main editor and your current note takes the reference seat.
- Bases have a
</>Source button next to the filename that flips between the table and the raw file (YAML). The table is drawn from your vault notes, so if you want to see what the file itself says — comparing sync conflict copies, above all — the source is the place to look. - Bases get view tabs on top to flip through table/cards/board (it remembers your last tab), and clicking a row or card opens that note inside the panel — mind map note cards are clickable too. Wandered off? ‹ Back returns you to the exact view and scroll spot. ⌘/Ctrl+click opens in the main editor instead!
- Save any note and the base beside you refreshes on its own a moment later — edits from the AI agent or sync, and theme switches, follow along too.
- Zoom with the slider below or a two-finger pinch — mind maps go up to 1000% (vector-sharp!).
Two notes side by side — no split panes ✍️🪟
"I want to see the top of this long piece while I write the bottom", "I want to glance at that note while writing this one" — Reference View does that job, without carving the screen into split editors.
- Put the current note beside you: run Open current note in Reference View from the command palette (⌘P). The note you're writing appears on the right, so you can read one part while writing another (the two sides scroll independently!).
- Typing shows up beside you right away: while the same note is open in Reference View, edits appear there moments later (~0.3s) — no waiting for a save — and your reading position stays put. (Other referenced notes still refresh whenever they're saved.)
- ⇄ Swap: want to properly edit the note you've been referencing? One press of the Swap button next to the file name brings it into the main editor and sends the note you were writing to the reference slot. Editing always happens in one place — the main editor — so there's nothing to get confused about.
⏱️ Tap a timestamp in a transcript and jump straight to that moment!
See those timestamps like [12:34] at the start of the lines in a transcript note? They're not just decoration — tap one and playback jumps right to that moment. 🎯
- No more scrubbing back and forth wondering "where did they say that again?" Just find it in the transcribed text and tap the time. Done!
- You can write them yourself, too. Put the number of seconds after
#t=, like[[lecture.mp4#t=754]], and you've got a link straight to that moment. (It's exactly the same idea as a PDF's[[paper.pdf#page=3]]— one says "which page," the other says "which second"!) - A transcript without timestamps is still a perfectly good transcript. If the AI adds them, great; if not, you still get clean text. (Right now, timestamps come with Gemini transcription.)
Highlight a PDF, and the quote lands in a note 📑🖍️
Want to underline as you read a paper, then later see just those passages collected in one place? Open the PDF in Reference View and drag across the text.
- Let go and a color palette pops up. Pick a color and the passage gets highlighted right there — and at the same time, the quote is saved into a note. Two things in one!
- It goes into that PDF's companion note — a
paper.mdappears next topaper.pdf(if it doesn't exist yet). The quote is saved along with which page it came from, as a[[paper.pdf#page=3]]link, so later you just click that link to go right back to the page. - Instead of a color, hit Save quote to file the quote without highlighting, or Insert here to drop it plain — no quote marks, no source — right at your cursor in the note you're writing. (Use that one when it's not a citation but raw material for your own writing!)
💡 The note is the original. Highlights aren't stored off somewhere — ObsiKO reads the quotes in the companion note and re-paints them every time you open the PDF. Which means —
- Delete the quote block from the note and the highlight disappears with it.
- Move the note to another device and the highlights come along.
- Your original PDF file is never touched. 😉 (Open it in any other viewer and it's pristine!)
- Click an existing highlight to change its color or remove it. The picker that opens is exactly the same as the editor's highlight picker — Default (theme) + 7 colors, with ✕ (no color) at the end to remove the highlight.
- Delete from either side and both go. Remove it in the PDF and the quote leaves the companion note; press ✕ on that quote in the note and the PDF highlight disappears too. (In the note, ✕ takes the whole thing — quote, source line, and any memo you wrote under it. The button tells you so on hover.)
- Even if the same sentence appears several times on one page, don't worry — ObsiKO remembers the exact one you picked.
- Open the companion note in another app like Obsidian? It just reads as a neatly highlighted quote. → Markdown Basics
Highlight Markdown notes too — right in Reference View 🖍️📝
It's not just PDFs. Drag across text in a Markdown note opened in Reference View and the same color palette appears — mark up a source note as you read.
- Storage works the opposite way from PDFs: a note is Markdown, so there's no companion note — the highlight (
==text==) goes straight into the note itself. It looks the same in the editor, and in Obsidian too. - Click an existing highlight to change its color or remove it (✕) — same picker as the editor's.
- Since this edits your original file, it works deliberately carefully — it only paints when your selection pins down exactly one spot in the document. If the same sentence appears in several places and it can't be sure, it does nothing and tells you why. (Surrounding context resolves most cases automatically!)
- It won't paint inside code blocks or frontmatter, and it politely declines selections that would cut formatting like
**bold**in half. 😉 - If that note is also open in the editor, a single ⌘Z undoes it.
When the text is really a picture — 'Read region' 🔍
In a PDF scanned from old material, the text is actually an image, so there's nothing to drag-select. For those, turn on the Read region button in the toolbar and draw a box around the part you want.
- ObsiKO crops just that piece and reads the text out of it. (It's the same engine as the right-click 'Extract text from image' — so on iPhone, iPad, and Android it runs free, right on your device, with no internet!)
- The recognized text then flows into the exact same popup as above — save it as a quote or insert it into your text, your call!
- One catch: a scan has no text to paint over, so no highlight appears on screen. The quote still lands in your note, though.
Bulky PDFs, slim down in one click! 📉 (Desktop only)
- Open a vault PDF in Reference View, and a Compress button quietly appears next to the filename. It shrinks down PDFs bloated with scanned pages or high-res material.
- Click it and choose a quality level — Maximum compression (72dpi, for screens) · Recommended (150dpi, e-book-friendly balance of quality and size) · High quality (300dpi, for printing).
- The original is left untouched — a new, smaller
(compressed)file is created and opened right away. (If a PDF is already small enough, it'll honestly tell you "This won't get any smaller." 😉) - Compression is powered by a tool called Ghostscript. Don't worry if it's not installed — open the
?help button next to the title and there's a one-click⬇︎ Install Ghostscriptbutton. It installs automatically via Homebrew on macOS or winget on Windows. (If neither is available, it'll point you to the download page.) - This feature only works in the desktop app (the compress button doesn't appear on web or iPad).
Drop your computer's files right into the vault (drag & drop) 📥
- Try dragging a PDF, image, or other file from your computer straight onto the file tree on the left. ObsiKO will automatically copy it into the current vault (or that folder) for you!
- From there, keep your files inside the vault and call them up in notes with
[[links]], or pop them open in Reference View — done! Staying organized just got a lot easier.
Instantly convert documents to Markdown (.md) 📄→📝
Got someone else's document (Word, PDF, HWP, etc.) that you want to turn into an ObsiKO note so you can edit, link, and search it? Just right-click (or long-press) it in the file tree → 'Convert to Markdown (.md)'. If you already have the document open in Reference View, the toolbar's 'Convert' button does exactly the same thing. The app converts it directly, no AI needed, and it works across every platform (iPhone, iPad, web included) with no installation in most cases.
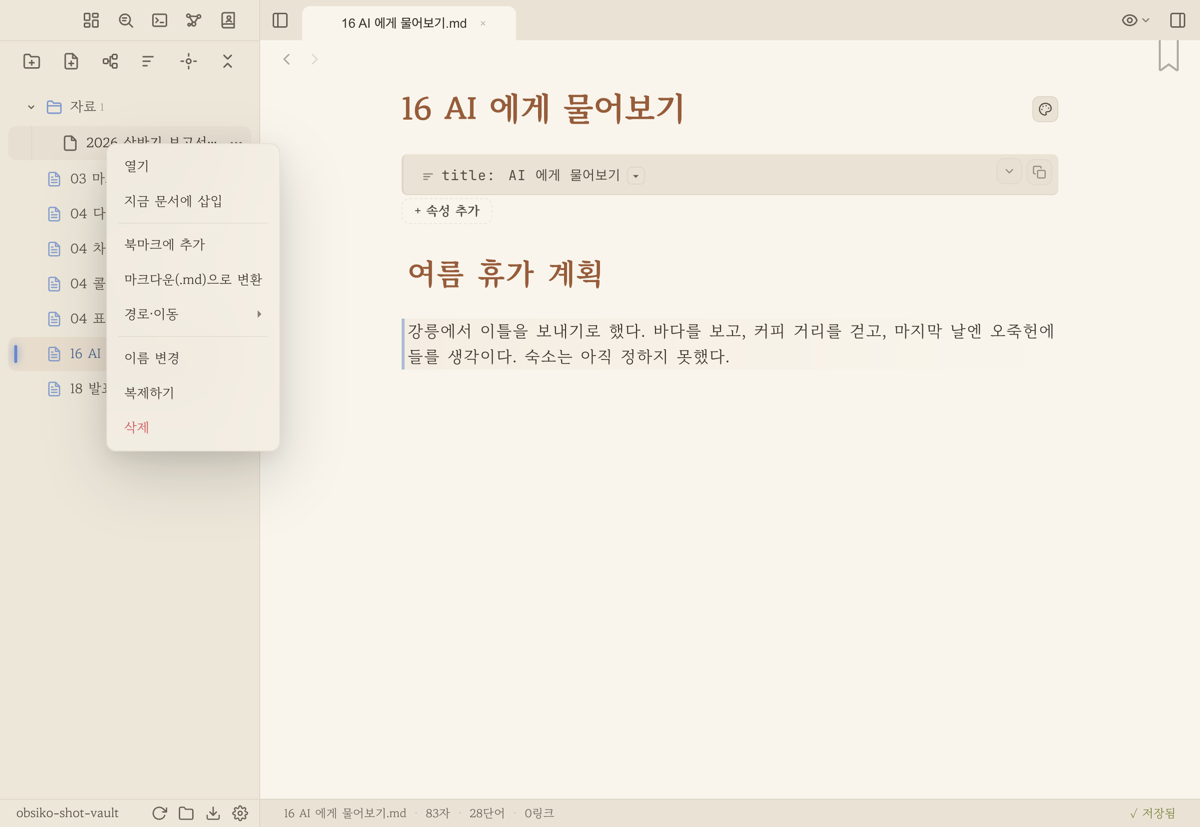
▲ Right-click a document (PDF, Word, HWP, etc.) in the file tree → 'Convert to Markdown (.md)'. Right-click a folder and there's also Export & convert ▸ 'Convert entire folder to Markdown'.
- Formats that work instantly, no install: PDF · Word (.docx) · Excel (.xlsx/.xls) · CSV/TSV · JSON · HTML · plain text (.txt, etc.), and even Korean HWP files (
.hwp,.hwpx)! No separate program or pandoc needed — headings, bold/italic and tables carry over, and images inside the document are extracted intoassets/too. Even legacy.hwpkeeps its tables and pictures, and the reference viewer now shows them styled — tables as tables, pictures as pictures. - On desktop, with
pandocinstalled, you also get: PPTX · ODT/ODP/ODS · EPUB · RTF · TeX · reST · org · fb2, and more. (pandocis free — without it, those formats just won't show up in the menu.) - Choose how to convert: pick between 'Convert as-is' (fast, mechanical conversion) and 'Clean up with AI' (tidies up broken line breaks and noise while keeping the meaning intact). AI cleanup only shows up if you have an API key or the desktop agent set up (it never changes the content or numbers).
📁 Convert a whole folder at once
Got a folder packed with documents? No need to do them one by one! Right-click the folder → Export & convert ▸ 'Convert entire folder to Markdown', and it scans subfolders too, converting all the documents to .md in one go.
- If a
.mdfile with the same name already exists, it skips it to avoid duplicates, and quietly passes over things it can't extract text from, like scanned (image-only) PDFs. - It only asks about the conversion method (as-is/AI cleanup) once per folder, for convenience — and if there are a lot of files, a confirmation dialog appears before it starts.
💡 Text-in-images (OCR) and audio/video transcription are a different track from this document conversion — use the right-click options 'Extract Text from Image' and 'Voice/Video → Note (Transcribe)' for those instead! On iPhone, iPad and Android a 'Fast (on-device)' mode is built in — the same engine as your photo app's text recognition (Apple Vision · ML Kit), so it's free and offline; pick 'Smart (AI)' when you want tables and structure cleaned up too. → AI Agent
A whole new world of copy-paste! Smart paste & drag 🪄
- Copy a web address (URL) and paste it over some text — and just like that, it transforms into a clean link! No extra steps needed.
- Copy an image and paste it in, or drop one straight onto the screen. It's automatically saved neatly into the
assets/folder and inserted right into your document. - Drag a file from the left sidebar straight into the editor, and it gets linked neatly right at that spot. (Yes, this works on iPhone too!)
Navigation methods that pair perfectly with this 🚀
- While you're at it, why not master the art of hopping between linked notes too? → Wiki Links & Tags, Backlinks & Outline
← Previous: Korean Writing Tools · Home · Next: Wiki Links & Tags →